
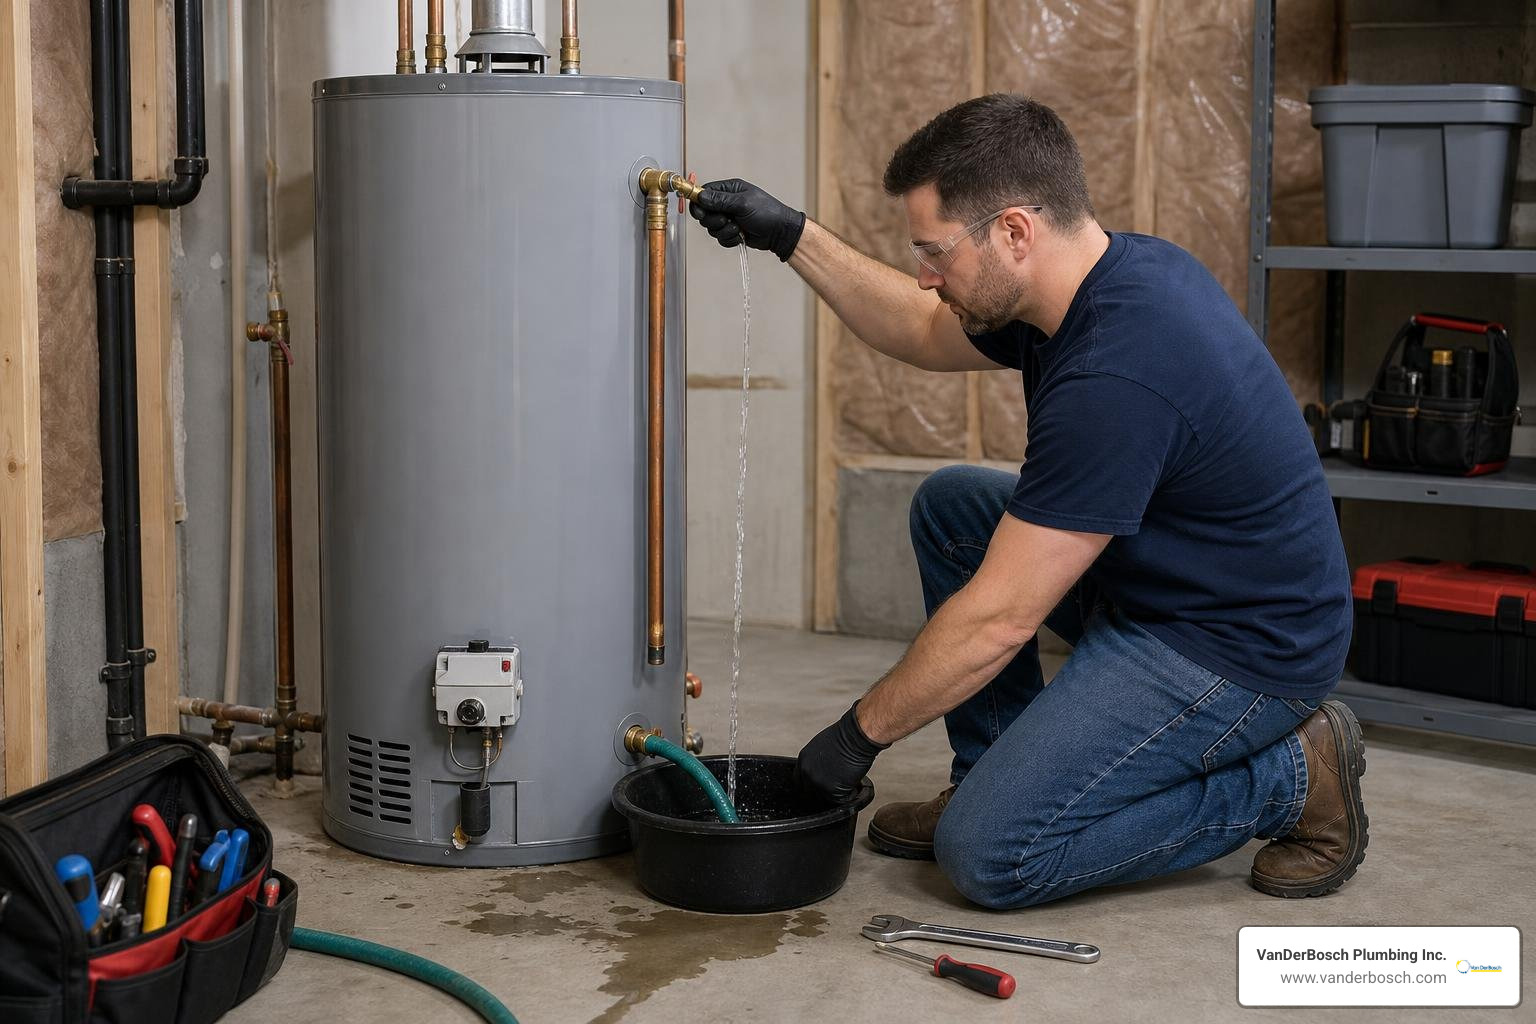
What You Need to Know About Water Heater Tank Maintenance
Water heater tank maintenance is the routine care that keeps your hot water running, your energy bills low, and your tank lasting as long as possible. Here’s a quick summary of what it involves:
Annual water heater tank maintenance checklist:
- Flush the tank — drain sediment buildup once a year (every 6 months in hard water areas)
- Inspect the anode rod — replace it if the diameter is under 0.5 inches or the core wire is exposed
- Test the T&P relief valve — lift the lever briefly to confirm it discharges and reseats properly
- Check the thermostat — confirm it’s set to 120°F
- Inspect for leaks — look for rust, moisture, or drips around the base and connections
- Insulate exposed pipes — especially important in cold Chicago basements
Your water heater works every single day — heating water for showers, dishes, laundry, and more — and most homeowners never think about it until something goes wrong. That first blast of ice-cold water in the morning has a way of changing that quickly.
The stakes are real. Water heaters account for roughly 17% of your household energy bill, and a standard tank-style unit is expected to last around 10 years. Skip the maintenance, and that lifespan can drop by 2 to 3 years — or more in hard water areas like Chicagoland, where Lake Michigan water carries enough dissolved calcium and magnesium to accelerate sediment buildup significantly.
The good news? Most of the work is straightforward, and a little effort each year goes a long way.
I’m Hugh Hodur, President of VanDerBosch Plumbing Inc., and I’ve overseen hundreds of water heater repairs, replacements, and maintenance calls across the Chicagoland area. Proper water heater tank maintenance is one of the most cost-effective things a homeowner can do, and this guide walks you through exactly how to do it right.
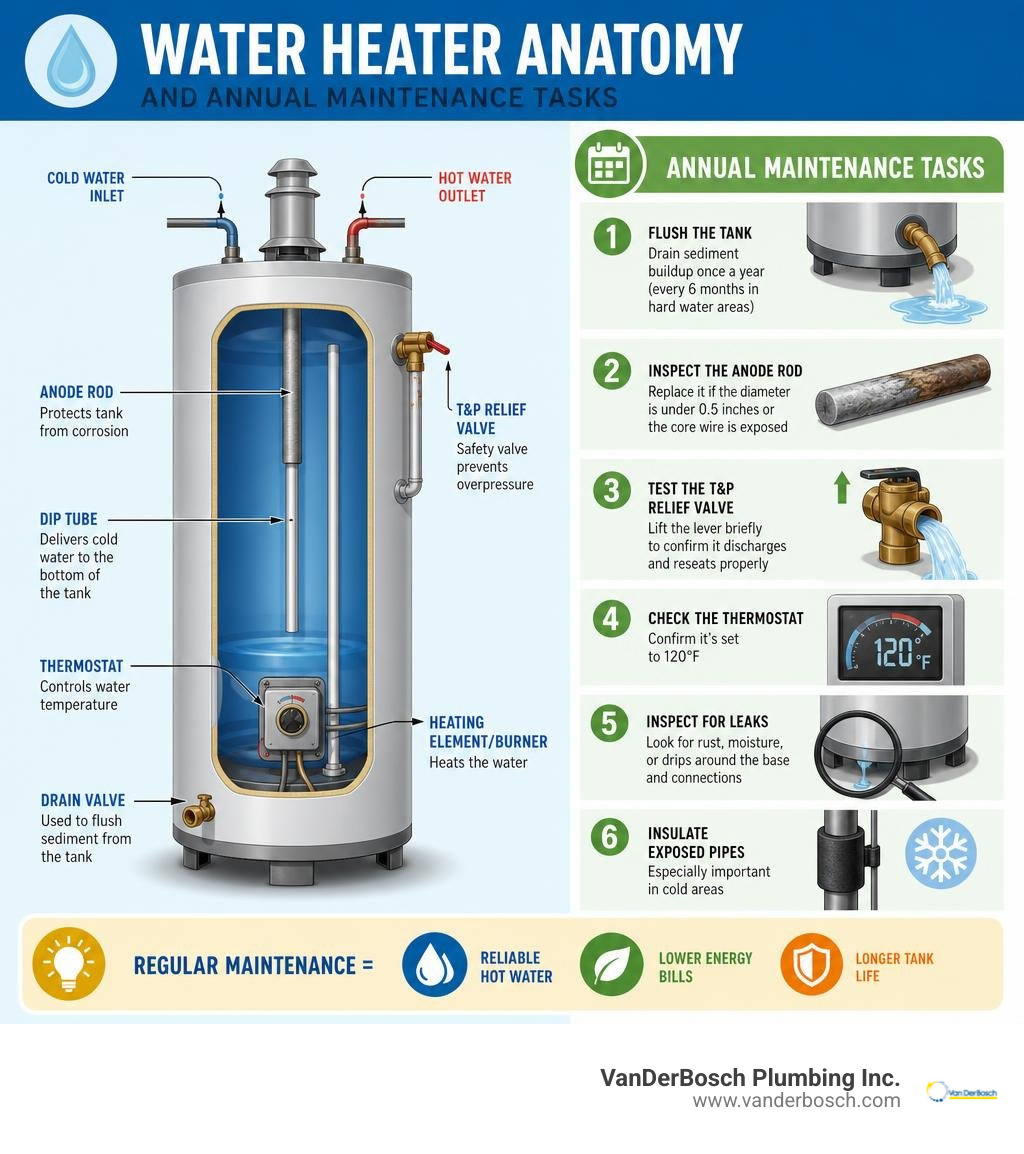
Simple guide to water heater tank maintenance:
The Importance of Annual Water Heater Tank Maintenance
To understand why water heater tank maintenance is so critical, you have to look at what happens inside your tank over time. Water is a universal solvent, meaning it carries dissolved minerals wherever it goes. When municipal water from Lake Michigan or local Cook County groundwater is heated, these minerals—primarily calcium and magnesium—separate from the water and settle as solid sediment at the base of the tank.
This mineral scale creates a thick, rocky crust over the heating elements in electric models or directly above the burner assembly in gas units. This layer acts as an insulating barrier, physically blocking heat transfer. Because the heat cannot easily pass through the sediment, your water heater has to run longer and hotter to heat the same volume of water. The result is a direct spike in your monthly utility bills and severe thermal stress on the steel tank liner.
Over time, this intense thermal stress causes the protective glass lining of the tank to crack. Once water makes contact with the raw steel beneath, rust-out is inevitable. According to the Water Heater Maintenance Guide from A. O. Smith, regular preventative maintenance can easily add three to five years of operational life to your system. Without it, a unit designed to last 10 to 12 years can fail in as little as 5 to 7 years. Recognizing the early signs your water heater needs repair is key to preventing a catastrophic leak that could flood your basement.
Signs Your Water Heater Needs Immediate Attention
Your water heater will rarely suffer a silent, sudden death. In most cases, it will practically scream for help before it finally gives out. Homeowners who know what to look and listen for can easily catch minor issues before they turn into expensive emergencies.
The most common warning sign is a loud, strange sound coming from the utility room. If you hear popping, banging, or rumbling noises while the water is heating, you are experiencing what plumbers call “kettling.” This occurs when water gets trapped beneath a thick, hardened layer of mineral sediment at the bottom of the tank. As the burner fires up, the trapped water boils and turns to steam, violently bubbling up through the sediment layer. It sounds exactly like a boiling kettle filled with stones, and it is a clear sign that your tank is overdue for a flush.

Other unmistakable warning signs include:
- Rusty or discolored hot water: If your cold water runs clear but your hot water has a reddish or brown tint, the sacrificial anode rod has likely failed, and the steel tank itself is starting to rust.
- Cold showers and slow recovery times: If your hot water runs out halfway through a shower or takes hours to recover, sediment has likely displaced a significant volume of water in the tank, or one of the electric heating elements has burned out.
- Visible puddles or drips: Moisture around the base of the unit can indicate a failing T&P valve, a loose drain spigot, or a microscopic fracture in the steel tank itself. Understanding why your water heater is leaking is the first step in deciding whether a simple repair will suffice or if a full replacement is required.
It is worth noting that a brand-new gas water heater may produce a small puddle of water in the drain pan or a sizzling sound the very first time it is lit. This is usually normal condensation forming on the cold steel tank, which disappears entirely once the water reaches operating temperature. However, persistent water pooling is a serious issue that requires professional diagnostic attention.
Step-by-Step Water Heater Tank Maintenance Procedures
Performing routine preventative care on your water heater is a highly manageable DIY project that takes less than an hour. However, because you are dealing with pressurized hot water, high-voltage electricity, or natural gas, safety must always come first.
Before you touch any valves or connect any hoses, you must completely shut down the energy source to the unit. For electric water heaters, locate your home’s main service panel and switch off the dedicated double-pole circuit breaker. For gas water heaters, turn the control dial on the gas valve to the “Pilot” or “Off” position. If you turn on an electric water heater while the tank is empty, the dry heating elements will burn out and short-circuit in a matter of seconds.
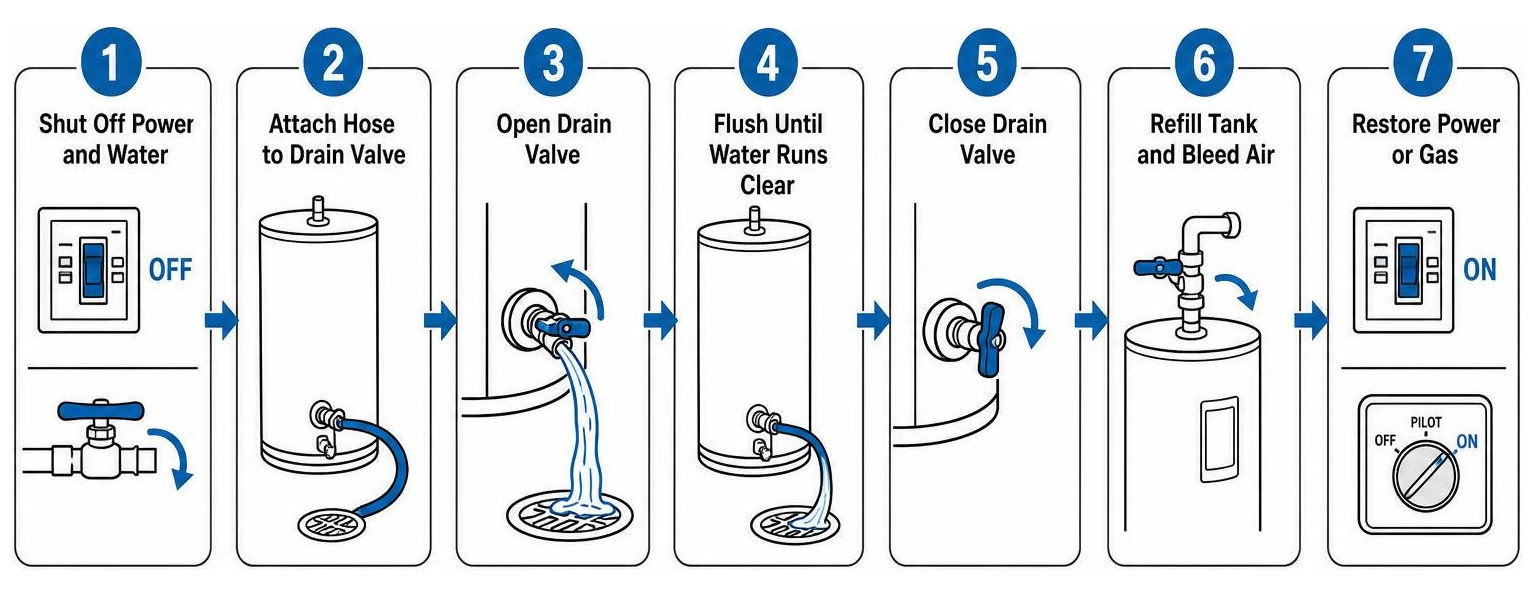
How to Flush Your Water Heater Tank
Flushing your tank is the single most effective way to eliminate sediment buildup and restore heating efficiency. Here is how to perform a thorough, professional-grade flush:
- Shut off the power and water: Turn off the gas or electricity as described above. Next, turn the cold water inlet valve at the top of the tank clockwise to stop the flow of new water into the system.
- Let the water cool: To prevent severe scalding burns, allow the water in the tank to cool for at least 30 to 60 minutes. If you are in a hurry, you can proceed with caution, but wearing protective work gloves and safety goggles is highly recommended.
- Connect a garden hose: Attach a standard garden hose to the drain valve located at the bottom of the water heater. Route the other end of the hose to a safe drainage area, such as a basement floor drain, a utility sink, or an outdoor area. If you are draining into a floor drain, place a kitchen colander over the drain to catch loose sediment and prevent it from clogging your home’s waste lines.
- Open a hot water faucet: Open a hot water tap on an upper floor of your home (such as a bathroom sink or bathtub). This breaks the vacuum seal inside the plumbing system, allowing the tank to drain smoothly and quickly.
- Open the drain valve: Use a flathead screwdriver or turn the built-in handle to open the drain valve fully. The water will begin to flow through the hose.
- Use the “stir-and-drain” method: To get the absolute cleanest tank possible, try this trick. Once the tank is empty, briefly turn the cold water inlet valve back on for 15-second bursts. This surges fresh water into the bottom of the tank, agitating and stirring up the heavy, compacted sediment so it can be flushed out through the hose. Repeat this until the water exiting the hose runs completely crystal clear.
- Refill and restart: Close the drain valve and disconnect the hose. Turn the cold water inlet valve back on to fill the tank completely. Keep the hot water faucet upstairs open until water flows steadily without sputtering, which indicates all trapped air has been bled from the system. Only after the tank is completely full should you restore gas or electrical power to the unit.
For further reading on this process, you can refer to the How to Flush a Water Heater Step-by-Step Guide. If you run into any mechanical issues during the restart, check out our guide on how to fix a water heater for quick troubleshooting tips.
Essential Tools for Water Heater Tank Maintenance
You do not need a truck full of specialized plumbing gear to maintain your water heater. In fact, you can find almost everything you need in a basic home toolbox. Here is what you should have on hand before you begin:
- Standard garden hose: A heavy-duty rubber hose is preferred, as it can withstand hot water temperatures without softening or kinking.
- Flathead screwdriver: Many standard plastic and brass drain valves feature a slot-head stem rather than a traditional handle.
- Channel lock pliers or pipe wrench: Useful for loosening stubborn hose connections or tightening a stiff drain valve.
- 1-1/16 inch deep well socket wrench: This is the specific size required to unscrew the hex head of the sacrificial anode rod from the top of the tank. An electric impact wrench can make removing a factory-tightened rod significantly easier.
- Teflon thread seal tape: Essential for wrapping the threads of a new anode rod or replacement drain valve to ensure a watertight seal.
- Safety gear: Heavy-duty work gloves and safety glasses to protect yourself from hot water splashes and flying debris.
Checking the Anode Rod for Water Heater Tank Maintenance
The sacrificial anode rod is the unsung superhero of your water heater. Suspended inside the tank, this rod is made of a highly active metal—usually magnesium, aluminum, or zinc—that corrodes much faster than the steel tank itself. Through a natural electrochemical process called galvanic corrosion, the water’s corrosive elements attack the anode rod instead of the tank’s steel walls.
Because it literally sacrifices its own body to save your water heater, the anode rod must be inspected every three years (or annually if you use a water softener, which accelerates rod depletion). According to the Water Heater Maintenance Schedule Checklist, you should replace the rod immediately if:
- The diameter of the rod has shrunk to less than 0.5 inches.
- More than 6 inches of the steel core wire inside the rod is exposed.
- The rod is heavily coated in a thick layer of calcium scale.
To inspect or replace the rod, turn off the water and power, drain a few gallons of water from the tank to lower the water level, and use your 1-1/16 inch socket wrench to unscrew the rod from the top of the unit. If you have limited ceiling clearance in your basement, you can purchase a segmented “link” anode rod, which folds like tent poles and can easily be inserted into tight spaces.
Testing the T&P Valve and Setting the Thermostat
The Temperature and Pressure (T&P) Relief Valve is your water heater’s ultimate safety device. If the thermostat fails and the water inside the tank begins to boil uncontrollably, the T&P valve is designed to open automatically once internal pressure hits 150 psi or the temperature reaches 210°F. This releases the excess pressure, preventing the tank from exploding.
To test the valve, place a bucket under the discharge pipe connected to the T&P valve at the top or side of the tank. Lift the metal test lever on the valve for 2 to 3 seconds. You should hear a rush of water and see it flow into the bucket. When you release the lever, the valve should snap closed and stop dripping immediately. If no water flows, or if the valve continues to drip slowly after testing, it is faulty and must be replaced immediately.
While you are testing the safety components, check your thermostat settings. The Department of Energy recommends setting your water heater to 120 degrees Fahrenheit. This temperature is hot enough for daily household needs, prevents the growth of harmful bacteria like Legionella (which can thrive in water below 115°F), and drastically reduces the risk of accidental scalding.
| Water Temperature | Time to Produce a Serious Burn |
|---|---|
| 120°F (49°C) | More than 5 minutes |
| 130°F (54°C) | Approximately 30 seconds |
| 140°F (60°C) | Less than 5 seconds |
| 150°F (66°C) | Approximately 1.5 seconds |
Frequently Asked Questions About Water Heater Care
How often should I flush my water heater?
For most standard households, we recommend flushing the water heater tank at least once per year. However, if you live in an area with hard water, you should adjust this schedule to every six months.
In Chicagoland, municipal water sourced from Lake Michigan typically has a mineral hardness level of 130 to 150 parts per million (ppm), which is classified as moderately hard to hard. Suburbs relying on local deep well systems often experience even higher hardness levels. This means sediment accumulates much faster in local homes than in soft-water regions. For a detailed breakdown of flushing intervals based on your specific water quality, check out the guide on How Often To Flush Your Water Heater by Rheem.
How does sediment buildup affect water heater efficiency?
Sediment acts as a thermal blanket at the bottom of your water heater. Because the burner or heating elements must heat through inches of rock-like mineral scale before reaching the water, the system has to run significantly longer cycles. This wasted energy directly inflates your natural gas or electricity bills. Furthermore, the constant overheating of the tank’s bottom causes the protective glass lining to degrade rapidly, while also causing electric heating elements to burn out prematurely.
Can I perform water heater tank maintenance myself?
Yes, most homeowners can safely perform basic maintenance tasks like flushing the tank, testing the T&P valve, and checking the thermostat. These tasks require only basic tools and can save you a significant amount of money over time.
However, you should always know your limits. If your water heater’s shut-off valves are frozen or seized, if you smell gas, or if you are uncomfortable working with high-voltage electrical connections, it is always best to call a licensed professional. Attempting to force a seized valve can lead to an immediate major leak, and incorrect gas line work poses severe safety hazards. You can review our breakdown of water heater repair costs to weigh the financial benefits of DIY maintenance versus professional service.
Conclusion
Routine water heater tank maintenance is the most effective way to protect one of the most hardworking and expensive appliances in your home. By taking less than two hours out of your year to flush sediment, inspect the sacrificial anode rod, and test the safety valves, you can prevent unexpected cold showers, lower your monthly energy bills, and keep your system running safely for years to come.
If you are dealing with a stubborn, seized drain valve, a leaking T&P valve, or if you simply prefer the peace of mind that comes with professional care, we are here to help. At VanDerBosch Plumbing Inc., we have provided expert, licensed residential plumbing services across Chicagoland—including Chicago, Roselle, Niles, Winnetka, Melrose Park, and Elmhurst—for decades.
We stand behind our work with a 100% satisfaction guarantee, 24/7 emergency availability, transparent pricing with absolutely no hidden service charges, and experienced, background-checked technicians. Schedule professional water heater services with us today to keep your home’s hot water flowing reliably.