What to Do When Your Sump Pump Isn’t Running
A sump pump not running when your basement needs it most is one of the most stressful things a homeowner can face. Here’s a quick breakdown of the most common causes and first steps:
| Cause | Quick Fix |
|---|---|
| No power / tripped breaker | Reset breaker or GFCI outlet |
| Pump unplugged | Check plug and outlet |
| Stuck float switch | Manually lift float or clear obstruction |
| Clogged impeller or intake screen | Remove debris, clean screen |
| Blocked discharge pipe | Clear clog or thaw ice blockage |
| Burned-out motor | Call a professional for replacement |
| Pump has exceeded its lifespan | Replace the unit |
If your pump has power but still won’t run, start with the float switch. If it hums but doesn’t move water, suspect a clog or failed impeller. If it’s completely silent and unresponsive, check your breaker and GFCI outlet first.
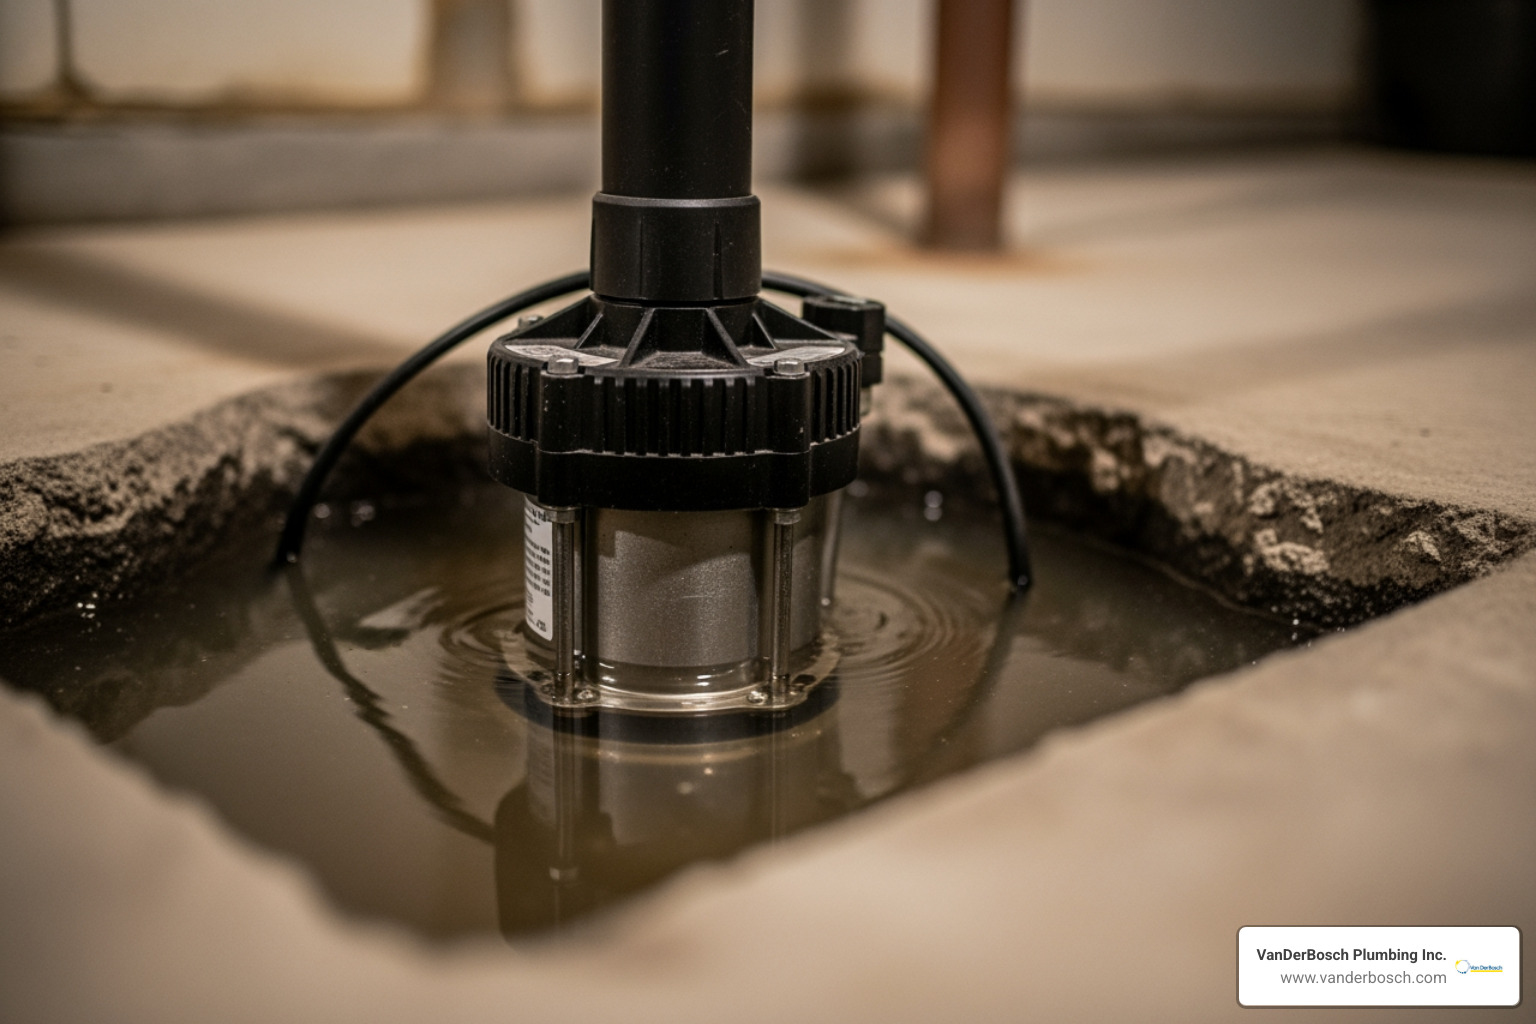
Your basement depends on one device to stay dry — and when that device goes quiet, water can rise fast. Whether you came home to a flooded floor or you’re doing a routine check before a big storm, understanding why your sump pump has stopped running is the first step to getting it fixed. The causes range from simple fixes you can handle in minutes to motor failures that need a professional. This guide walks you through all of it.
I’m Hugh Hodur, President of VanDerBosch Plumbing Inc., and over the years I’ve seen how a sump pump not running can turn a dry Chicagoland basement into a costly disaster. Let’s get your system diagnosed and your basement protected.
 Tripped breaker or GFCI outlet, 2) Unplugged power cord, 3) Stuck or tangled float switch, 4) Clogged impeller or intake screen, 5) Blocked or frozen discharge pipe, 6) Burned-out motor, 7) End of pump lifespan — each paired with a one-line fix and an estimated difficulty level of DIY or Call a Pro - sump pump not running infographic")
Is It Normal for a Sump Pump to Never Run?
If you’ve lived in your home for a few months and haven’t heard that familiar hum from the basement, you might start to worry. However, it is actually quite normal for a sump pump to remain inactive for long periods.
Sump pumps are reactive devices. They only spring into action when groundwater levels rise high enough to enter the sump pit and trigger the float switch or pressure sensor. In the Chicagoland area, our activity usually follows the weather. During a drought or a particularly dry summer in Roselle or Niles, your pump might not run for weeks or even months.
That said, “normal” inactivity shouldn’t be confused with a mechanical failure. If you see water rising in the pit and the pump remains silent, you have a problem. A dry sump pit is usually a sign that your foundation drainage is doing its job or that the water table is currently low. But because a reliable sump pump is your first line of defense, you shouldn’t wait for a flood to find out if it still works. Knowing how sump pumps protect against flooding means understanding that they are emergency equipment—like a parachute, you hope you don’t need it, but it must work when you do.
Troubleshooting a Sump Pump Not Running: Electrical and Power Checks
When we receive calls about a sump pump not running, the first thing we ask the homeowner to check is the power source. Sump pumps are high-draw appliances, and they are often located in damp environments that are prone to electrical trips.
Common Reasons Why a Sump Pump Not Running During a Storm
Storms are the ultimate “stress test” for your plumbing. Ironically, the moment you need the pump most is also when it’s most likely to lose power.
- Grid Failure: The average U.S. home was without power for more than 4 hours in 2016. If the neighborhood goes dark, your primary electric pump goes dark too.
- Circuit Overload: If your sump pump shares a circuit with other heavy appliances (like a freezer or power tools in a Sauganash basement), the surge of the pump starting up can trip the breaker.
- GFCI Trips: The National Electrical Code (NEC) now requires GFCI outlets for sump pumps. These are designed to shut off power if they detect a moisture-related short. While safe, they are notoriously sensitive and can trip during heavy rain or high humidity.
What to Check First for a Sump Pump Not Running Despite Having Power
If your lights are on but the pump is off, follow these steps:
- The “Piggyback” Test: Most pumps use a piggyback plug. The pump cord plugs into the back of the float switch cord, which then plugs into the wall. Unplug them both and plug the pump cord directly into the outlet. If it starts humming, your float switch has failed.
- The Outlet Reset: Look for the “Reset” button on your GFCI outlet. Press it firmly. If it immediately pops back out, there is a short in the pump or a fault in the outlet.
- The Breaker Box: Check your main electrical panel for a tripped breaker.
- Avoid Extension Cords: We strongly advise against using extension cords for sump pumps. They can overheat, cause voltage drops that damage the motor, and are a major fire hazard in wet basements.

Mechanical Failures: Why Your Sump Pump Won’t Turn On
If the power is fine but the unit is silent or making strange noises, we have to look at the mechanical components. Different pumps have different life expectancies, which can impact your troubleshooting.
| Pump Type | Average Lifespan | Pros/Cons |
|---|---|---|
| Submersible | 5–15 Years | Quiet, handles debris better, but harder to service. |
| Pedestal | 25–30 Years | Motor stays dry, very long life, but can be loud. |
If you have a high-quality unit like a Zoeller 50-series, these are built for durability, but even the best machines eventually wear out.
Signs of a Failed Float Switch and How to Fix It
The float switch is the most common point of failure. It’s a simple mechanical ball or tube that rises with the water.
- Tangled or Stuck: Vibrations from the pump can cause it to “walk” across the pit until the float hits the wall and gets stuck.
- Debris: A stray pebble or a buildup of soap scum (common if your laundry drains into the sump) can jam the mechanism.
- Lifespan: While a pump might last 10 years, float sensors often only last five to seven years. If your pump is 8 years old and won’t kick in, the switch is the likely culprit.
Clogs in the Impeller, Intake Screen, or Discharge Pipe
A pump that hums but doesn’t move water is usually fighting a blockage.
- The Intake Screen: This is located at the bottom of the pump. If your sump pit doesn’t have a lid, hair, lint, and dirt can clog this screen, starving the pump of water.
- The Impeller: This is the small fan inside the pump that pushes water. Small stones or gravel can get sucked in and jam the blades.
- Frozen Discharge Lines: In a Chicago winter, the pipe that leads the water outside can freeze. If the water has nowhere to go, the pump will run until it overheats and the motor burns out.
- Airlock: If you just installed a new pump, ensure there is a “weep hole” drilled in the discharge pipe between the pump and the check valve. This prevents air from getting trapped and stopping the flow.
How to Test If Your Sump Pump Is Working Properly
You shouldn’t wait for a thunderstorm in Elmhurst or Mount Prospect to see if your basement is protected. We recommend testing your pump at least once every three months.
- The Bucket Test: Slowly pour about 5 gallons (20 liters) of water into the sump pit.
- Observe the Activation: The water should rise until the float lifts, at which point the pump should turn on.
- Check the Discharge: Go outside and make sure water is actually flowing out of the pipe and away from your foundation.
- Listen: Listen for grinding or loud clunking. A healthy pump should have a steady, low hum.
- The Reset: Once the water is gone, the pump should shut off promptly. If it keeps running, the switch is likely stuck.
If you find yourself doing this test and the water just sits there, you may need to ask yourself: do you need a plumber for sump pump installation? If you aren’t comfortable taking the pump apart to clear an impeller, it’s time to call in the pros.
Repair vs. Replacement: When to Call a Professional
At VanDerBosch Plumbing Inc., we often get asked: “Can’t you just fix it?” The answer depends on the age of the unit and the nature of the failure.
If your pump is under 5 years old and has a stuck float, a repair is a great investment. However, if the motor has burned out or the housing is cracked and rusted, replacement is almost always the safer and more cost-effective choice. Most sump pumps generally last between seven and 10 years. If yours is in that window, replacing it proactively can save you thousands in flood damage.
Preventing Future Floods with Maintenance and Backups
A single pump is a “single point of failure.” To truly protect your home, we recommend a “belt and suspenders” approach:
- Battery Backup Systems: These include a second pump and a dedicated battery. If the power goes out or the main pump fails, the backup kicks in.
- Water-Powered Backups: These use your home’s municipal water pressure to suck water out of the pit. They don’t need electricity or batteries, making them incredibly reliable during long outages.
- High-Water Alarms: These inexpensive devices sit in the pit and scream if the water rises too high, giving you time to react before the floor gets wet.
- Quarterly Maintenance: Keep the pit clear of debris and ensure the check valve (the one-way valve in the pipe) isn’t letting water flow back into the pit after the pump stops.
Frequently Asked Questions about Sump Pump Failures
Can I repair a broken sump pump myself?
You can certainly handle basic troubleshooting like resetting a breaker, cleaning the intake screen, or untangling a stuck float. However, we don’t recommend DIY repairs on the internal motor or wiring. Sump pumps operate in water and carry high voltage; an improper repair can lead to electrical shocks or a fire. If the motor is dead, it’s usually cheaper to replace the unit than to pay for a motor rebuild.
How much does it cost to replace a sump pump?
In the Chicagoland area, costs can vary based on the horsepower of the pump and the complexity of the piping. On average, you might look at $600 to $1,500 for a professional installation of a high-quality, cast-iron submersible pump. Emergency service fees can apply if you wait until your basement is already under 18 inches of water, so proactive replacement is always the cheaper route!
Why is my sump pump motor humming but not pumping?
This is almost always one of three things:
- Airlock: Air is trapped in the pump. (Check for that weep hole!)
- Clogged Intake: The pump wants to move water but can’t “breathe.”
- Broken Impeller: The motor is spinning, but the blades that push the water have snapped off or are jammed by a rock.
Conclusion
Your sump pump is the unsung hero of your home, working in the dark to keep your foundation solid and your basement dry. When you realize your sump pump not running is a reality, don’t panic—but don’t wait. From simple power resets to full system upgrades, taking action now is the only way to prevent a disaster.
At VanDerBosch Plumbing Inc., we’ve been protecting homes in Chicago, Ukrainian Village, Hyde Park, and across the suburbs for decades. We offer licensed technicians, 24/7 emergency service, and a 100% satisfaction guarantee. We believe in transparent pricing and getting the job done right the first time so you can sleep soundly during the next big storm.
If you’re worried about your pump or need an expert eye to evaluate your flood protection, contact VanDerBosch for professional sump pump services. We’re here to ensure your basement’s defender never goes quiet when it matters most.


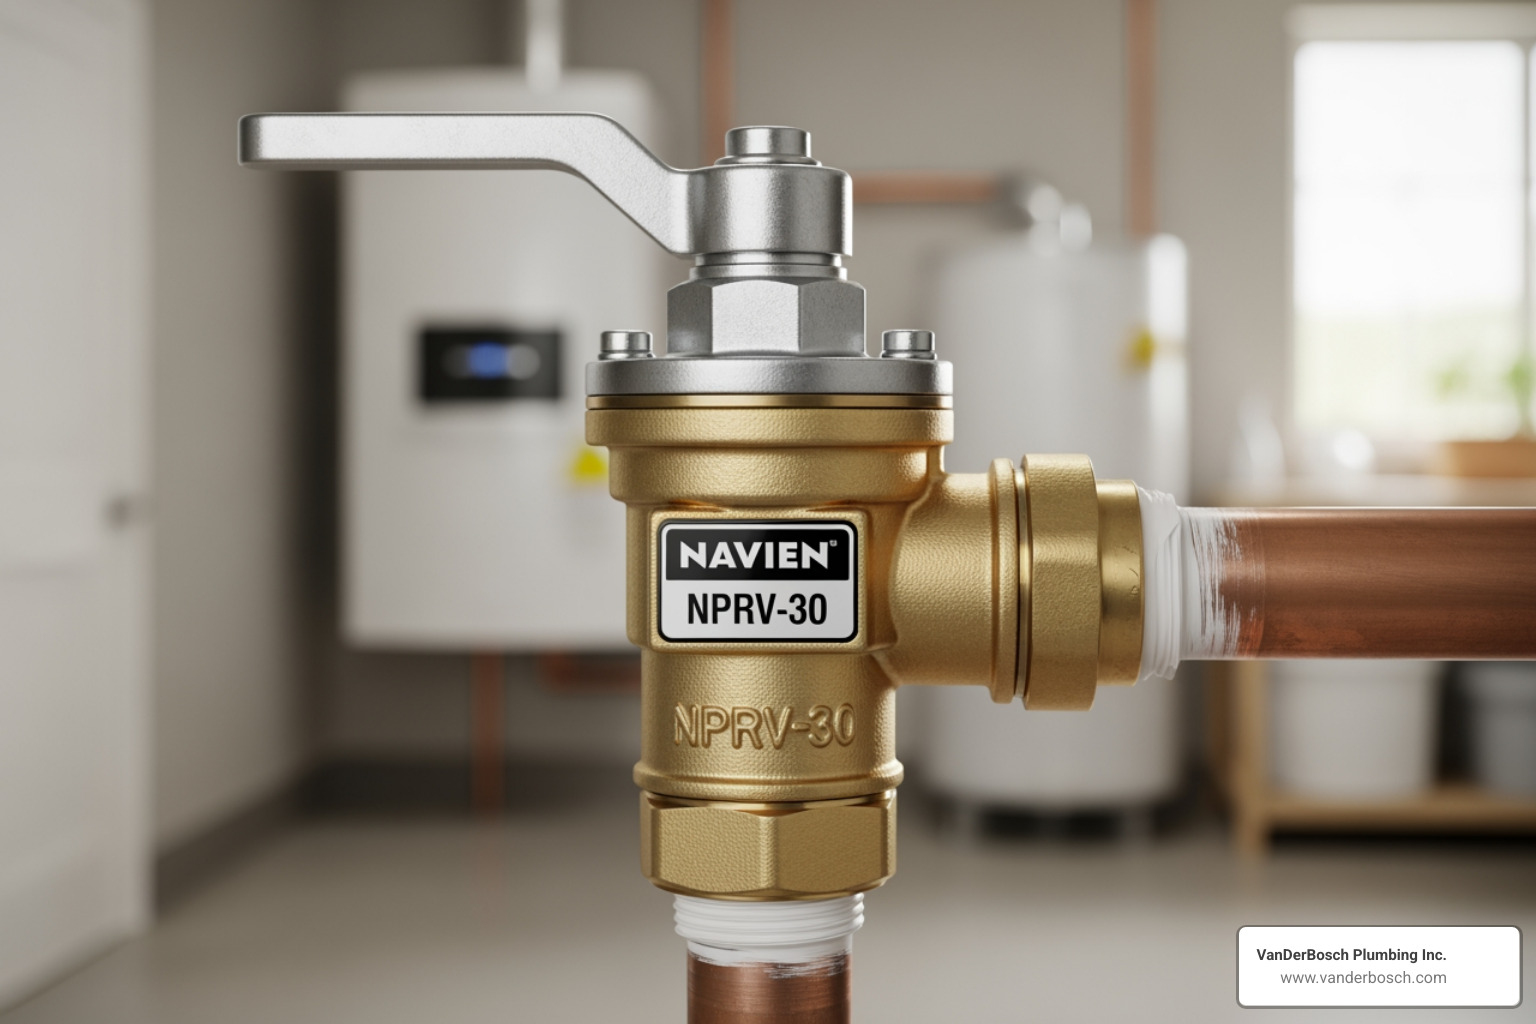
, the valve opens automatically to discharge excess pressure through the relief pipe to a drain, preventing dangerous over-pressurization and potential tank rupture - Navien pressure relief valve infographic")