
Adding a Garbage Disposal to an Existing Sink: The Quick Answer
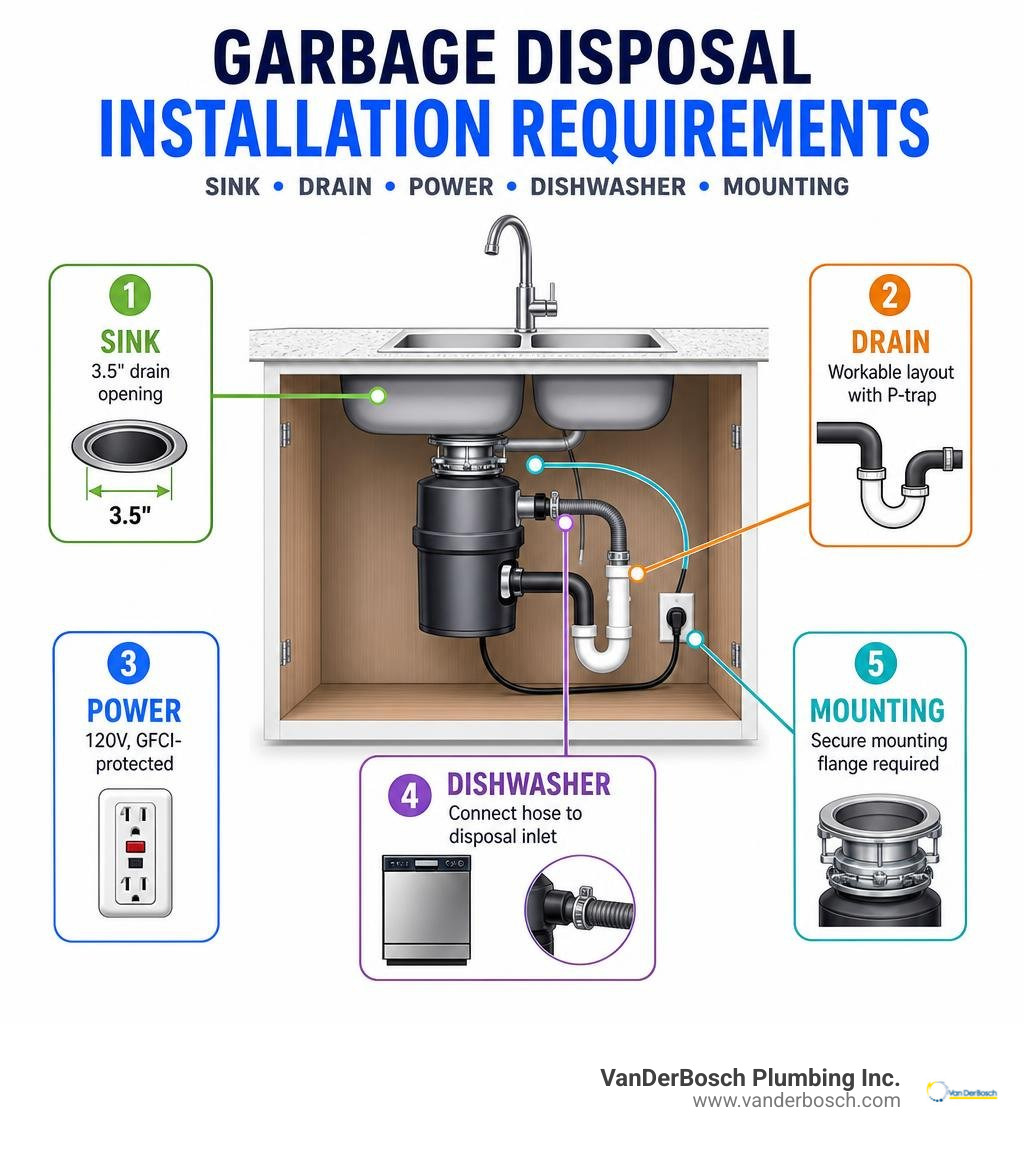
Adding garbage disposal to existing sink setups is usually possible, even when the sink has never had one before. The sink needs a standard 3.5-inch drain opening, enough cabinet space for a 15- to 25-pound unit, a workable drain layout with a P-trap, and a properly protected electrical connection.
| What to check | Why it matters |
|---|---|
| 3.5-inch sink drain opening | This is the standard size for most residential disposals. |
| Under-sink clearance | The disposal must fit below the basin without hitting shelves, pipes, or drawers. |
| Drainpipe layout | The disposal outlet sits lower and to one side, so the P-trap and drain pipes may need changes. |
| 120V, GFCI-protected power | A disposal needs a safe, accessible power source, usually on a 15- or 20-amp circuit. |
| Dishwasher connection, if applicable | The dishwasher hose connects to the disposal inlet after its factory plug is removed. |
A first-time installation takes more planning than swapping an old disposal. You may need a new mounting flange, reworked drain piping, and an electrician if there is no switched, GFCI-protected outlet under the sink. DIY work can save roughly $80 to $200 in labor, but new wiring, tight cabinet layouts, or old plumbing can make professional installation the safer choice.
I am Hugh Hodur, President of VanDerBosch Plumbing Inc., and I lead teams serving Chicagoland homes and businesses with plumbing, drain, and sewer needs. We see that adding garbage disposal to existing sink systems goes smoothly when the sink, drain, and electrical setup are checked before installation begins.
Simple guide to adding garbage disposal to existing sink terms:
Pre-Installation Check: Is Adding a Garbage Disposal to Existing Sink Configurations Possible?
Before running out to buy the shiny new appliance, you must verify that your current sink basin and under-cabinet cavity can handle it. Most modern kitchen sinks support garbage disposals seamlessly, but checking your hardware specifications beforehand saves you from crawling out from under the sink mid-job with a headache.
First, check the drain opening size. Standard residential sink drain openings measure 3.5 inches in diameter across virtually all major brands. If your sink has an unusual custom opening or an integrated porcelain strainer grid, you will not be able to mount a unit without replacing the sink itself.
Second, evaluate your sink material durability:
- Stainless Steel: Handles disposals easily. However, very thin gauge stainless steel sinks can flex or amplify motor noise during operation.
- Fireclay, Cast Iron, & Composite Quartz: Heavy-duty materials handle motor weight without flexing, but thick composite or fireclay basins require specialized installation care. Never use standard oil-based plumber’s putty on natural stone or composite quartz, as it can bleed oil and permanently stain the surface; use 100% silicone sealant instead.
Third, verify physical clearance. Garbage disposals weigh between 15 and 25 pounds and take up significant vertical and lateral space under the sink basin. Measure the height from the bottom of the sink drain down to the cabinet floor, and ensure you have at least 12 to 16 inches of open vertical clearance. Also, confirm that water supply valves, pull-out sprayer hoses, or water filtration systems will not collide with the disposer body.
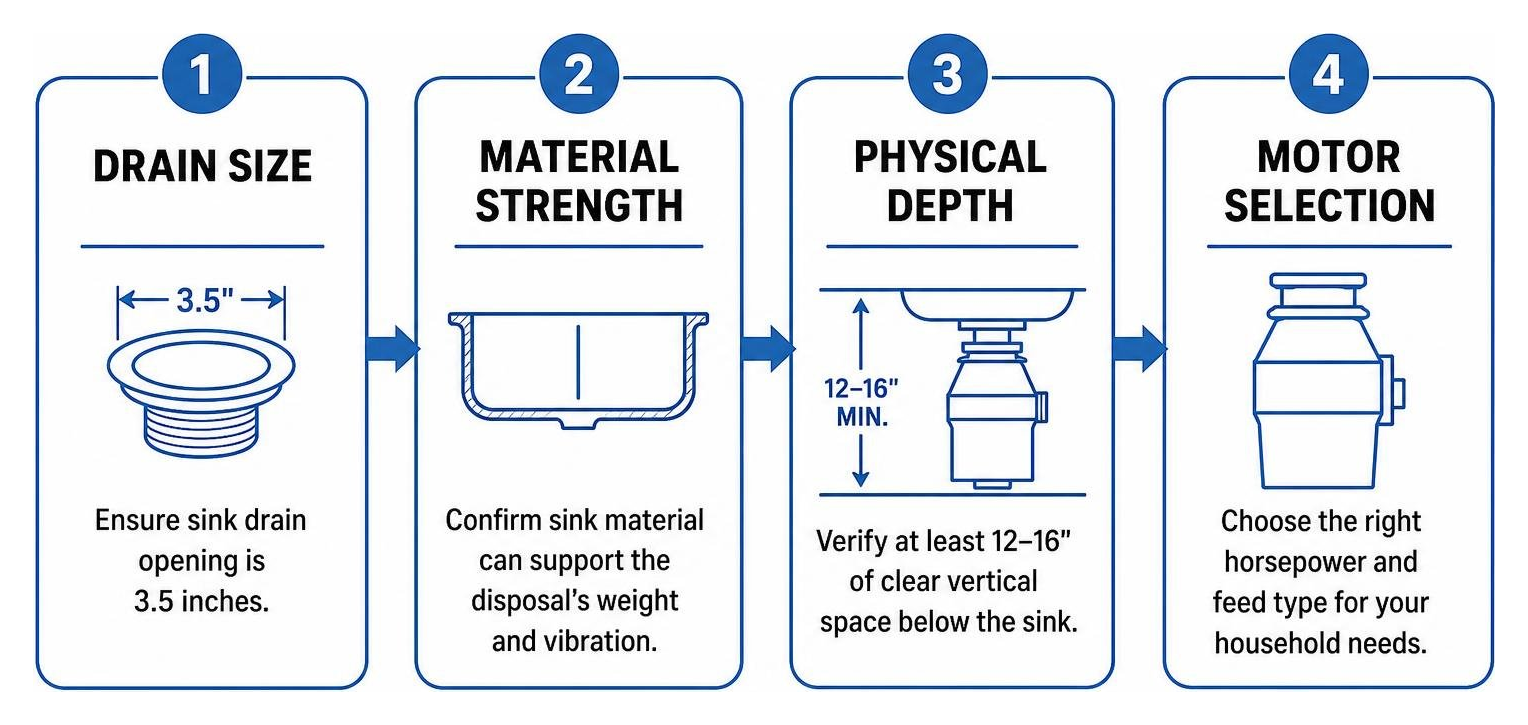
Finally, select the right motor horsepower and feed style for your household:
- 1/3 HP to 1/2 HP: Best for 1 to 2-person households with light cooking habits. Draws roughly 5 to 7 amps. Unit costs range from $90 to $150.
- 3/4 HP: Ideal for typical families of 3 to 4. Easily handles daily vegetable scraps and tougher food remnants. Draws 8 to 10 amps. Unit costs range from $150 to $250.
- 1 HP: Designed for heavy cooking, large families (5+ people), or grinding tough, fibrous foods. Draws 11 to 13 amps on a recommended 20-amp circuit. Unit costs range from $200 to $350+.
- Continuous Feed vs. Batch Feed: Continuous feed models operate via an electrical wall switch or countertop air switch while cold water runs. Batch feed models operate only when a magnetic stopper is inserted into the drain neck, making them a fantastic safety option for homes with small kids or sinks lacking a nearby electrical switch.
First-Time Installation vs. Disposal Replacement
It is important to understand the fundamental scope difference between a simple appliance replacement and a brand-new setup. Replacing an existing unit with the same brand takes roughly 30 to 45 minutes because the mounting assembly, plumbing lines, and electrical switch are already installed.
In contrast, adding a unit for the first time takes 1 to 2 hours (or longer for DIYers) because you must dismantle the old drain assembly, rebuild under-sink drain pipes, and establish dedicated electrical power. To learn more about evaluating your setup, check out this guide on Can I Add a Garbage Disposal to My Existing Sink? Installation Guide.
Planning the Plumbing and Electrical Requirements
A garbage disposal does not simply replace a sink strainer basket—it changes how water and waste travel through your under-sink infrastructure. Planning your pipe geometry and power supply before turning off your water line ensures a smooth, leak-free transition.
Understanding your existing pipe configuration is key to setting up proper drainage. If you want to dive deeper into how under-sink components interact, check out our guide on kitchen sink plumbing – navigating the pipes below.
Plumbing Modifications for Adding Garbage Disposal to Existing Sink Systems
When adding garbage disposal to existing sink configurations, the disposal unit’s discharge outlet sits significantly lower and offset from the original drain basket location. This offset requires altering your existing PVC or ABS waste lines.
Key plumbing rules to follow:
- Maintain Proper Slope: Waste lines coming out of the disposal discharge tube must slope downhill toward the P-trap and wall outlet at a minimum angle of 1/4 inch per foot. If your wall drain stub-out sits too high, water will sit inside the disposer chamber, leading to foul odors, premature rusting, and constant clogs.
- Double-Bowl Sink Setup: On a double-basin sink, the disposal mounts under one basin (usually the bowl closest to the dishwasher). The non-disposal basin drains into a continuous waste line equipped with a baffle tee. The internal baffle directs water downward, preventing the disposal from pumping food slurry over into the secondary sink bowl.
- P-Trap Alignment: Keep the P-trap properly aligned and hand-tighten slip-joint nuts before securing them with channel-lock pliers (add 1/2 turn beyond hand-tight; do not over-tighten plastic threads).
- Dishwasher Connection: If your kitchen features a dishwasher next to the sink, its drain line connects directly to the disposal’s barbed inlet nipple. For precise routing details, refer to our article on how to connect your dishwasher drain to a garbage disposer.
Electrical Requirements for Adding Garbage Disposal to Existing Sink Units
Garbage disposals run on standard 120V, 60Hz household electricity, but because they operate right next to plumbing fixtures, strict electrical safety rules apply.
- Circuit Sizing: Most disposals draw between 4 and 8 amps during continuous operation. They can run on a dedicated 15-amp or 20-amp circuit, or share a 20-amp kitchen branch circuit with a dishwasher (the combined electrical load remains safely under 15 amps).
- Wiring Specifications: Standard wiring requires 12 AWG copper wire on a 20-amp breaker or 14 AWG copper wire on a 15-amp breaker. Under National Electrical Code (NEC 210.8(A)(6)), GFCI protection is strictly required for all kitchen disposer outlets.
- Switch Control: A continuous-feed unit requires an activation switch. You can wire a standard wall switch or install a countertop air switch. Air switches use air pressure sent through a decorative button on the sink deck to trigger an under-sink power module—ideal for kitchen islands where running wall switch wiring is difficult.
- Hardwired vs. Power Cord: Under NEC rules, power cords attached to disposals must measure between 18 and 36 inches in length. Hardwiring involves feeding Romex (12/2 NM-B) cable directly into the disposer’s bottom junction box using a strain-relief clamp. Bench-wiring a cord kit onto the unit before lifting it under the sink makes installation far easier. For technical wiring details, visit Garbage Disposal Wiring: Wire Size, Switch, and GFCI….
Step-by-Step DIY Guide to Installing a Garbage Disposal
Ready to tackle the mechanical installation? Gathering all your tools ahead of time prevents crawling out from under the sink mid-job with messy hands.
Required Tools & Materials:
- Channel-lock pliers / adjustable pipe wrench
- Flathead and Phillips screwdrivers
- Plumber’s putty (or 100% silicone for composite/stone sinks)
- Hammer and steel punch/dowel (for dishwasher plug)
- Putty knife
- 1/4-inch hex key (Allen wrench)
- Bucket and old towels
- Disposer cord kit and wire nuts (if not pre-installed)
For a complete breakdown of modern mounting hardware, see How to Install a Garbage Disposal (2026).
Preparing the Sink and Mounting Flange
- Turn Off Power & Water: Turn off electricity at the main breaker box and shut off hot/cold water supply valves under the sink. Place a bucket underneath the drain pipes.
- Remove Old Drain Basket: Disconnect the existing P-trap and waste arms using channel-lock pliers. Unscrew the large lock nut holding the old sink strainer basket to the underside of the sink basin. Push the basket up and remove it.
- Clean the Sink Hole: Use a putty knife to scrape away old sealant, dirt, and corrosion around the 3.5-inch drain hole. Wipe clean with a damp cloth and dry thoroughly.
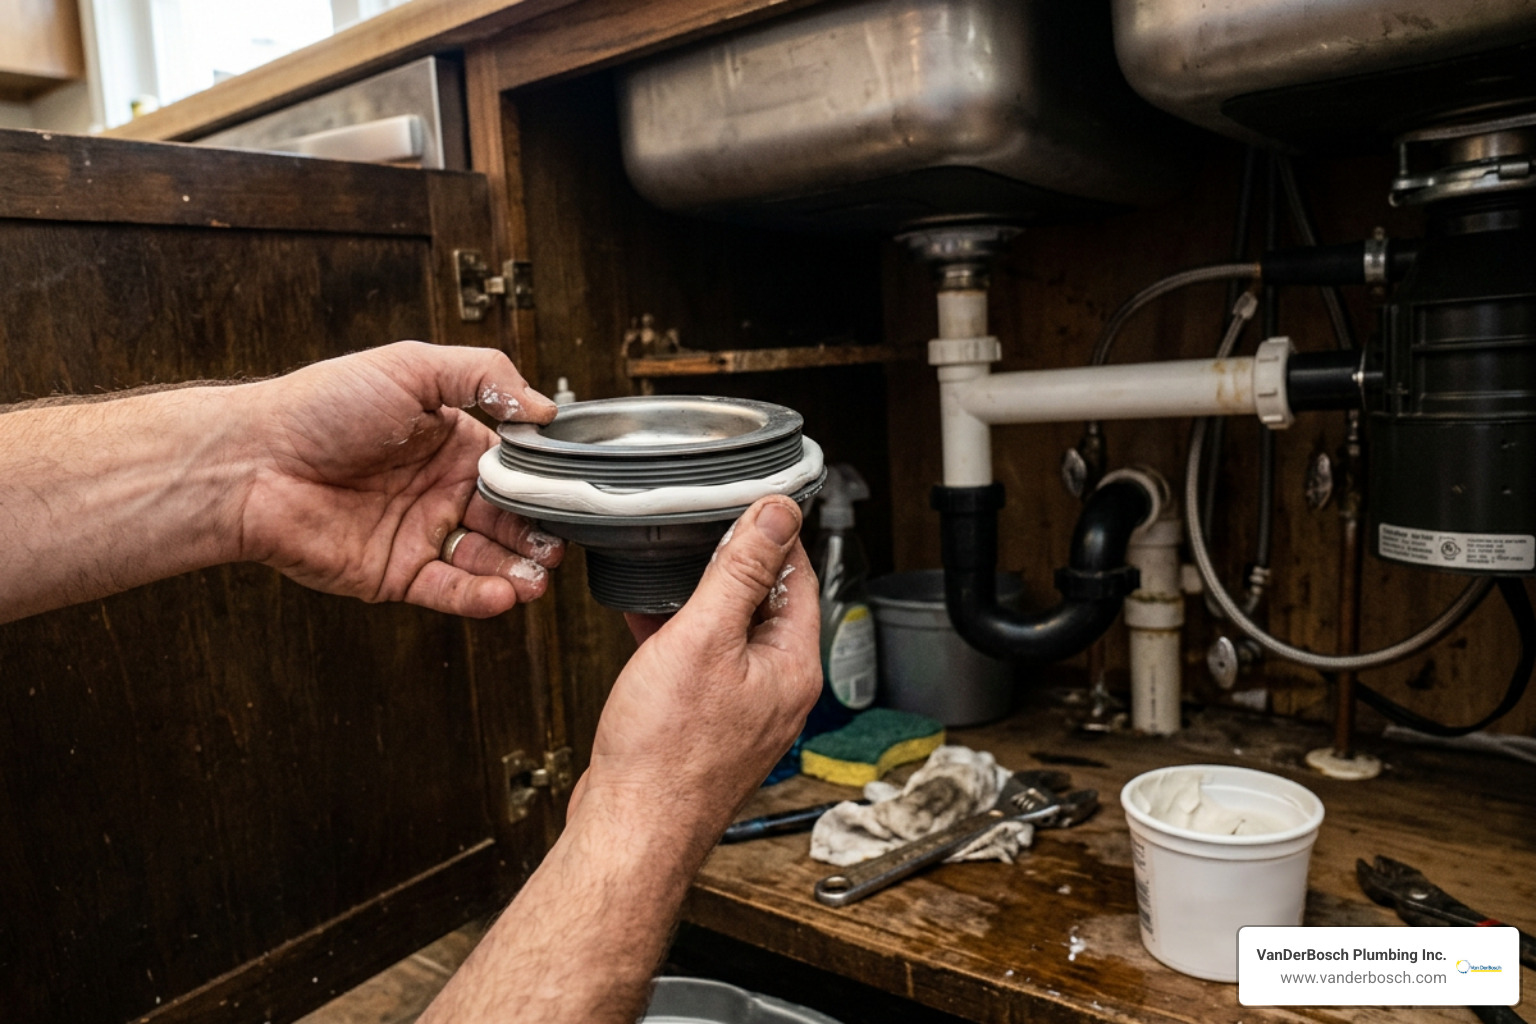
- Apply Sealant Rope: Roll out a 1/2-inch thick, 10-inch long rope of plumber’s putty. Place this putty ring underneath the lip of the new stainless steel sink flange. (Remember: use 100% silicone sealant instead if mounting to stone or quartz composite!).
- Set the Flange: Press the new flange firmly down into the sink drain opening from above. Place a heavy weight (like the new disposer unit wrapped in a towel) on top of the flange inside the sink basin to keep it firmly seated while working underneath.
- Install Under-Sink Hardware: Working under the sink, slide the rubber gasket, fiber gasket, and metal backup flange onto the exposed sink flange neck. Slide the 3-bolt mounting ring into place and snap the steel snap ring into the groove around the bottom of the flange neck.
- Tighten Mounting Screws: Tighten the three 3-bolt mounting screws evenly in a star pattern using a screwdriver until the backup flange seats tightly against the bottom of the sink. Wipe away excess plumber’s putty squeezing out around the drain inside the sink basin.
Mounting the Disposal Unit and Dishwasher Connection
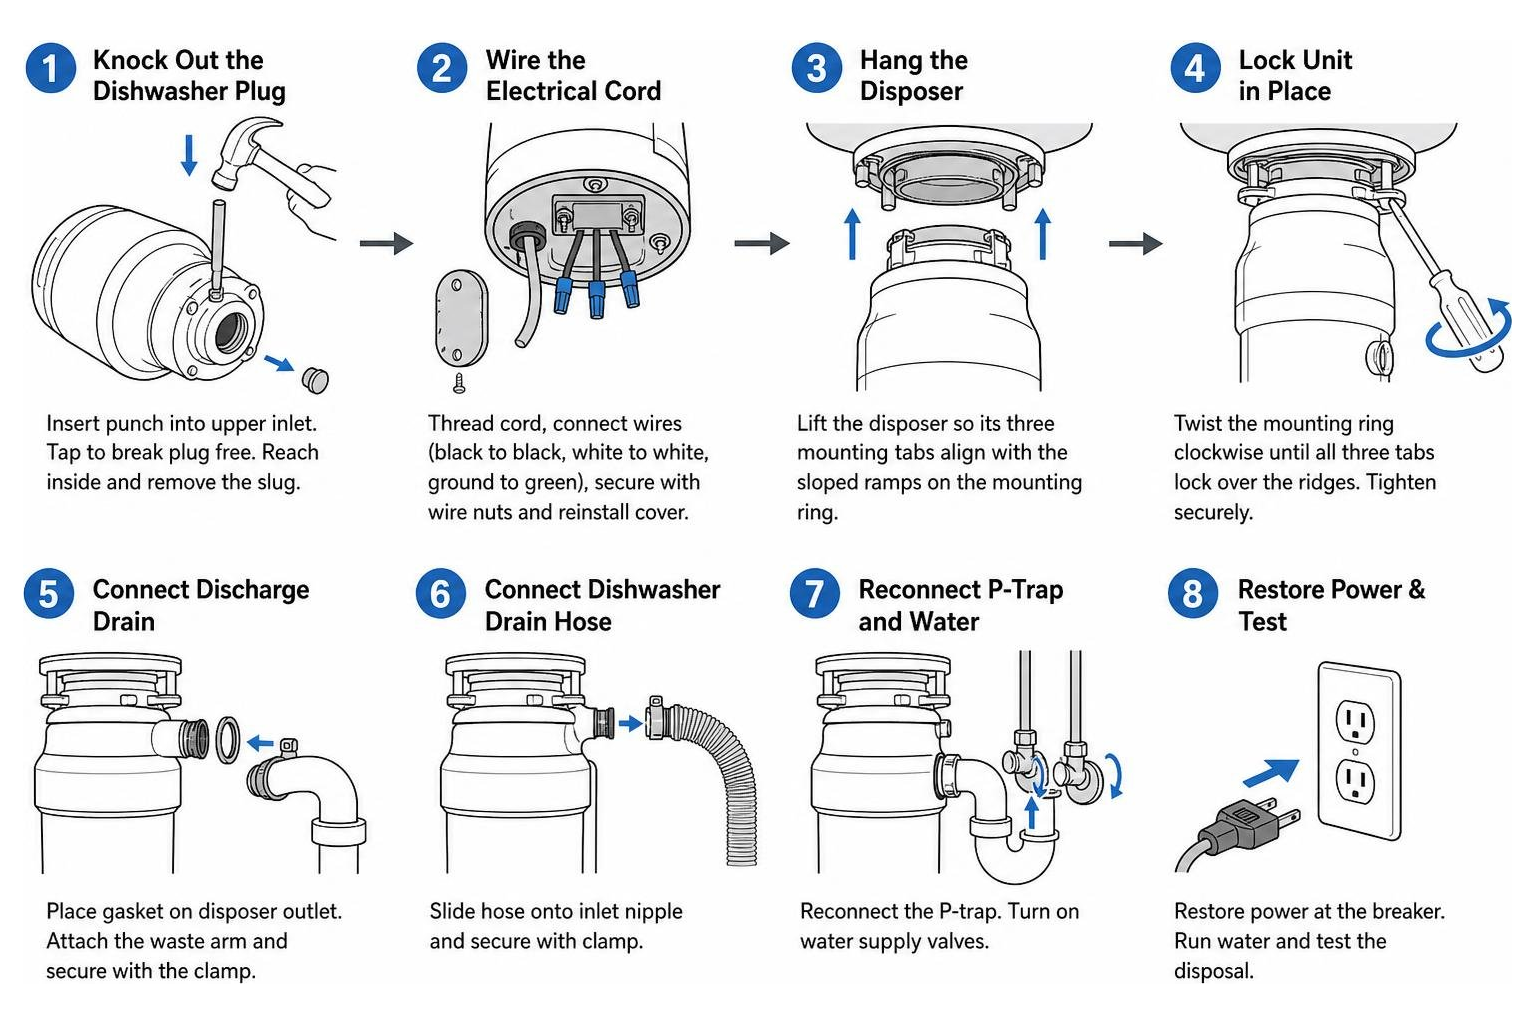
- Knock Out the Dishwasher Plug (Crucial!): If connecting a dishwasher, lay the disposal on its side on your workbench. Insert a steel punch or wooden dowel into the upper barbed dishwasher inlet hose nipple. Tap sharply with a hammer to break the internal plastic factory plug free. Reach inside the grinding chamber and retrieve the plastic slug! Leaving it inside will jam the impellers or clog your dishwasher drain.
- Wire the Electrical Cord: Remove the bottom electrical cover plate on the disposal. Thread the power cord through a strain-relief connector, twist matching wire leads together (black to black, white to white, green/bare copper to ground screw) using size-54 wire nuts, wrap with electrical tape, and reinstall the cover plate.
- Hang the Disposer: Position the disposal under the mounting assembly. Lift the unit so its three mounting tabs line up with the sloped ramps on the mounting ring.
- Lock Unit in Place: Twist the lower mounting ring clockwise until all three tabs lock securely over the ridges. Use a screwdriver inserted into one of the mounting ring lugs as a lever to turn and lock the ring tightly into place.
Connecting Drain Lines and Leak Testing
- Attach Discharge Tube: Insert the rubber gasket into the disposer discharge outlet, attach the black elbow discharge pipe, and secure it with the provided metal flange and screws.
- Reconnect Plumbing Lines: Connect the discharge elbow to your P-trap and continuous waste line using slip-joint nuts and rubber washers. Adjust pipe lengths as necessary to maintain a downward slope of at least 1/4 inch per foot.
- Connect Dishwasher Hose: Slip your dishwasher drain hose onto the upper barbed inlet nipple, secure it tightly with a worm-gear hose clamp, and ensure the hose features a high loop (fastened up under the countertop) or connects to an air gap to prevent wastewater backflow.
- Perform Leak Test (Before Power): Insert the sink stopper, fill the sink basin with 3 to 4 inches of cold water, and remove the stopper. Inspect all under-sink connections, slip joints, and flange gaskets with a flashlight for drips.
- Power-On Test: Plug the disposer into the switch-controlled GFCI outlet (or restore breaker power). Turn on cold running water, flip the switch, and let the motor run for 30 seconds to verify smooth, quiet operation.
Common First-Time Mistakes to Avoid
Even experienced DIYers sometimes slip up during a first-time installation. Avoid these common pitfalls to keep your kitchen plumbing running smoothly:
- Leaving the Dishwasher Knockout Plug Inside: Forgetting to remove the internal plastic slug after knocking it out is the single most common installation mistake. The loose plastic piece will fly into the impellers when powered on, jamming the unit instantly.
- Skipping GFCI Protection: Operating a water-adjacent motor without GFCI circuit protection violates electrical code and creates an unsafe electrical shock hazard under your sink cabinet.
- Improper Trap Slope (P-Trap Higher Than Outlet): Connecting the discharge pipe into a high wall drain creates standing water in the disposer bottom, causing foul odors, premature seal decay, and stubborn drainage backups. If you run into stubborn drain clogs after installation, refer to our troubleshooting steps for a clogged garbage disposal fix in chicago without the mess.
- Using Wrong Flange Sealant: Using oil-based plumber’s putty on composite granite or natural marble causes oily ring stains. Always use 100% neutral-cure silicone on stone basins.
- Over-Tightening Slip Joint Nuts: Overtightening plastic drain pipe nuts distorts the rubber washers, cracking plastic threads and causing hidden water drips.
DIY DIY vs. Professional Installation: When to Call a Plumber
Completing a DIY garbage disposal installation saves roughly $80 to $200 in labor costs. If your under-sink space already has a switched GFCI outlet and well-aligned PVC drain pipes, a intermediate DIYer can complete the project in 1 to 2 hours with standard hand tools.
However, hiring a licensed plumber is the smarter, safer choice when:
- No Under-Sink Electrical Power Exists: Adding new 120V wiring, running Romex through walls, or installing new breaker switches requires a qualified professional.
- Drain Piping Requires Major Re-Routing: Reconfiguring old galvanized steel or cast iron drain lines requires specialized cutting and pipe-fitting tools.
- Tight Cabinet Layouts: Navigating tight under-sink spaces with deep double-bowl sinks requires specialized plumbing expertise.
- Local Building Permits: Some Chicagoland municipalities require plumbing or electrical permits for adding new fixed appliances to branch circuits.
Overall project costs typically break down as follows:
- Disposals Unit: $90 to $350 (depending on HP and sound insulation)
- Drain Fittings & Cord Kit: $20 to $65
- Professional Labor: $80 to $200
- Total Installed Cost: $200 to $625
To see detailed breakdown details for local service, check out our guide on garbage disposal installation cost in Chicago IL.
Frequently Asked Questions
Can I install a garbage disposal in a sink that has never had one?
Yes! As long as your sink basin features a standard 3.5-inch drain opening and you have at least 12 to 16 inches of vertical clearance below the drain, you can install a disposal. You will need to modify under-sink drain pipes to meet the lower discharge outlet and ensure a switch-controlled, GFCI-protected electrical outlet is available nearby.
Do I need a GFCI outlet for a garbage disposal?
Yes. Per modern National Electrical Code (NEC 210.8(A)(6)), all kitchen receptacles serving appliances near water sources require GFCI protection. You can satisfy this requirement by installing an under-sink GFCI receptacle outlet or by feeding the circuit from a GFCI circuit breaker in your electrical panel.
How do I connect a dishwasher to a new garbage disposal?
To connect a dishwasher drain hose, lay the disposal unit on its side before mounting and use a hammer and steel punch to knock out the internal plastic plug inside the top barbed inlet nipple. Retrieve the broken plastic plug from inside the grinding chamber. Then, slide your dishwasher drain hose over the barbed fitting under the sink, secure it with a hose clamp, and ensure the hose routes in a high loop up under the countertop.
Conclusion
Adding garbage disposal to existing sink setups turns your kitchen sink into a far more convenient food-prep hub. By inspecting drain sizes, selecting the ideal horsepower motor, following NEC electrical code safety standards, and leak-testing your plumbing before restoring power, you can successfully tackle or plan your installation with complete confidence.
When under-sink electrical wiring, tight plumbing configurations, or stubborn drain lines feel overwhelming, trust the licensed professionals at VanDerBosch Plumbing Inc.. Serving Chicagoland homes and businesses across Cook County—including Chicago, Roselle, Niles, Winnetka, Melrose Park, Elmhurst, and Mount Prospect—we provide transparent pricing with no service charges, background-checked technicians, 24/7 emergency availability, and a 100% satisfaction guarantee.
Contact our expert team today to explore our full range of residential plumbing services!