
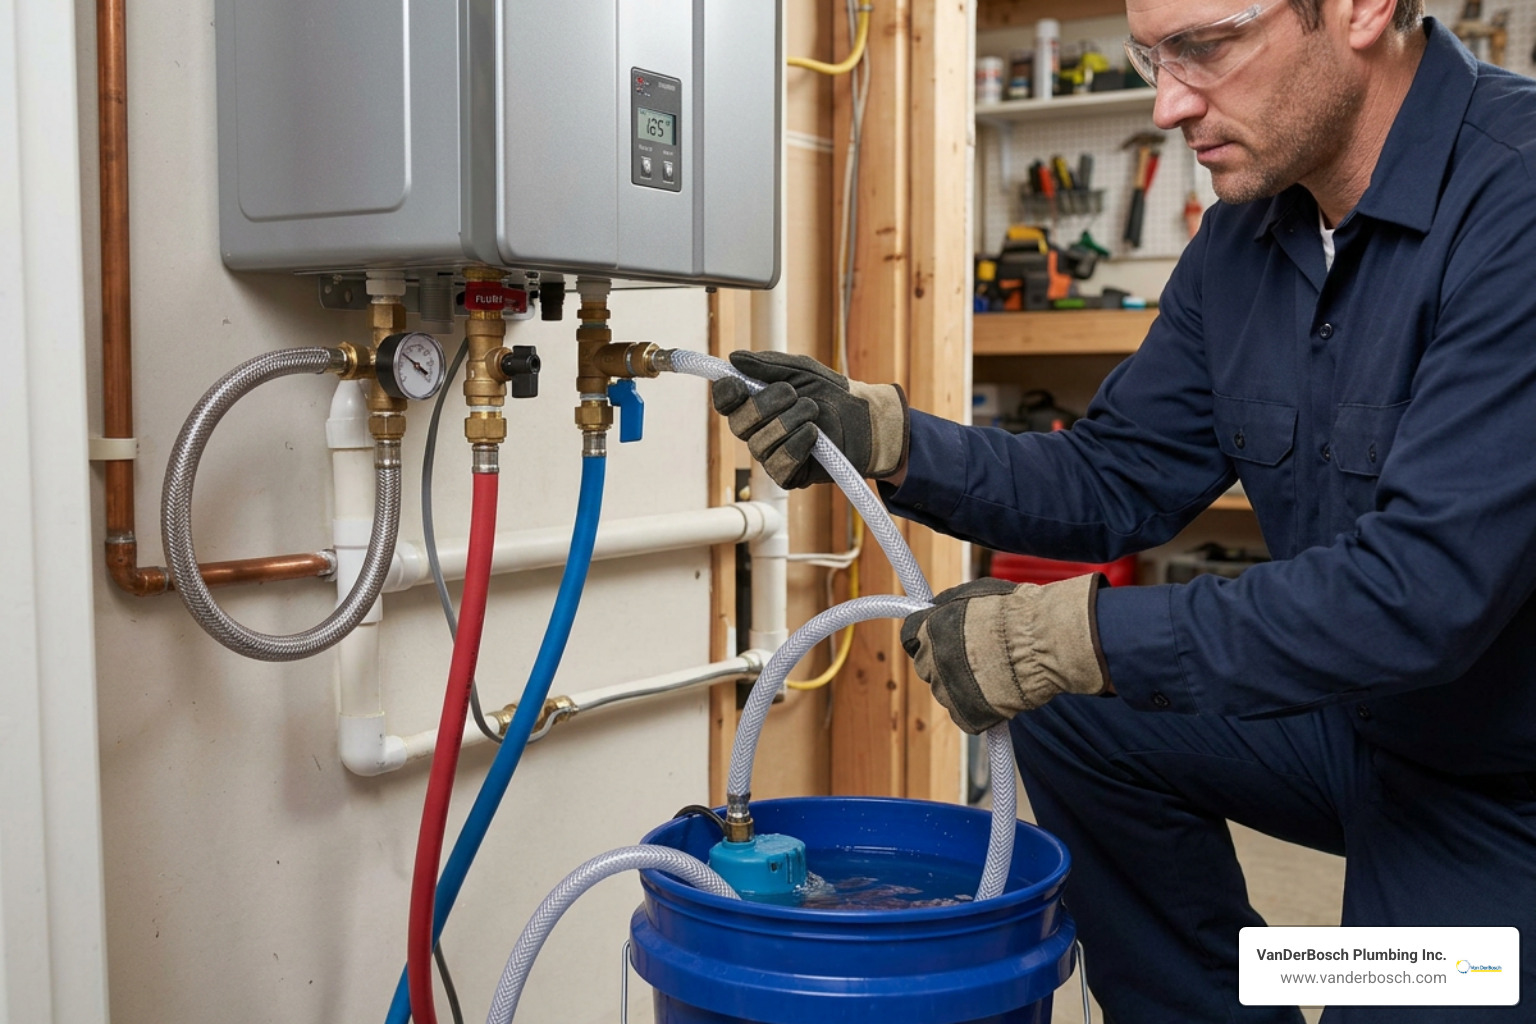
Why Tankless Water Heater Maintenance Matters
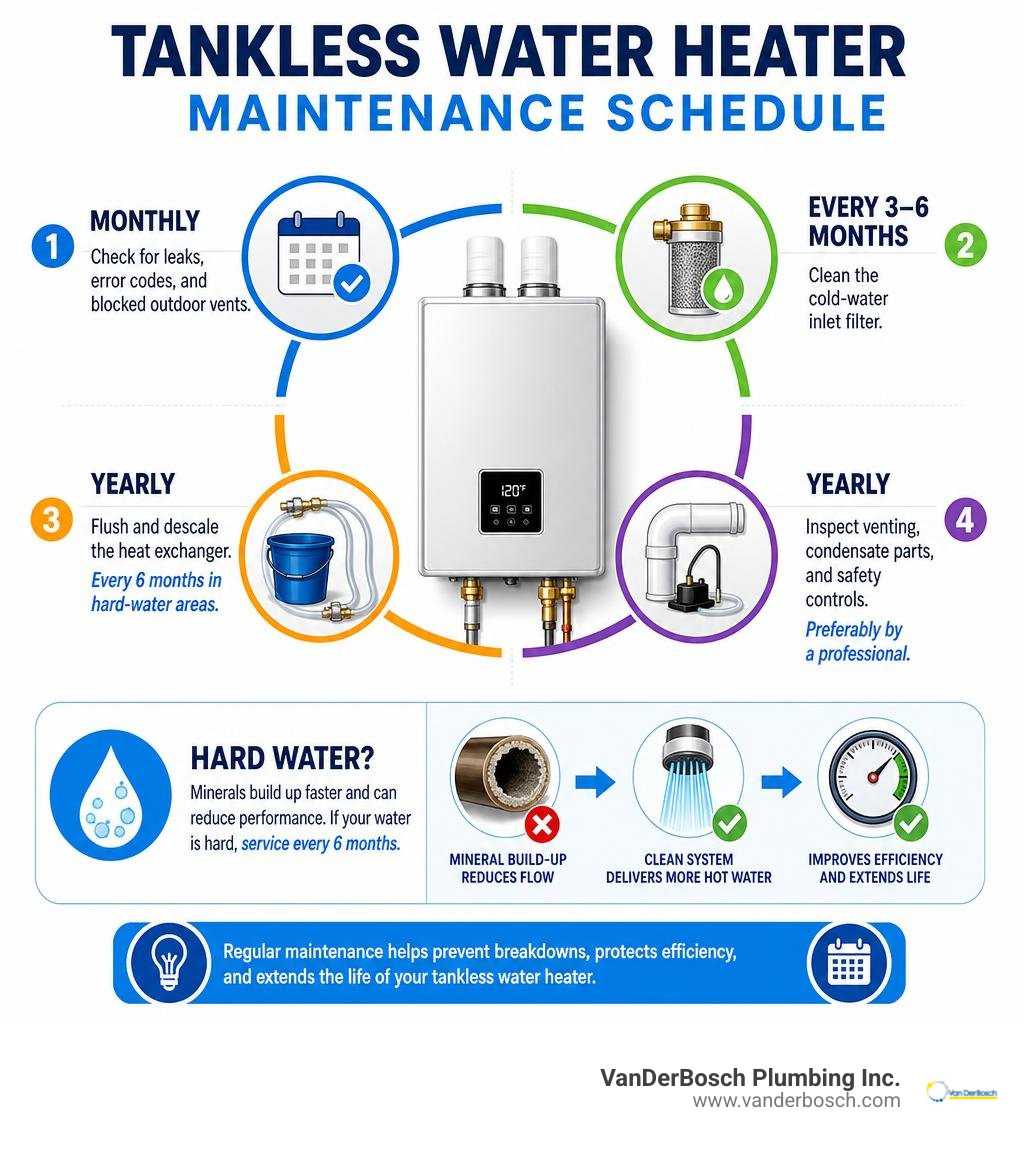
Tankless water heater maintenance means flushing mineral scale from the heat exchanger, cleaning filters, and checking key safety parts at least once a year. If your water is hard, service may be needed every 6 months because calcium and magnesium can build up faster, reduce hot-water flow, and make the unit work harder.
| Quick maintenance task | Typical timing |
|---|---|
| Check for leaks, error codes, and blocked outdoor vents | Monthly |
| Clean the cold-water inlet filter | Every 3 to 6 months, or as needed |
| Flush and descale the heat exchanger | Yearly; every 6 months in hard-water areas |
| Inspect venting, condensate parts, and safety controls | Yearly, preferably by a professional |
Tankless heaters do not store water, but they are not maintenance-free. Minerals can bake onto the heat exchanger as water heats up. Even a thin layer of scale can cut heat transfer efficiency by an estimated 20% to 30%, leading to temperature swings, weaker flow, higher energy use, and expensive repairs.
Regular care helps protect the long lifespan tankless systems are known for. A maintained unit can often last 15 to 20 years, while a neglected heater in a hard-water home may fail much sooner.
I am Hugh Hodur, President of VanDerBosch Plumbing Inc., where I lead residential and commercial plumbing teams serving Chicagoland homes and businesses. Our experience with tankless water heater maintenance, repairs, and replacements has shown that a simple service routine can prevent many urgent no-hot-water calls.
Basic tankless water heater maintenance vocab:
The Core Benefits of Tankless Water Heater Maintenance
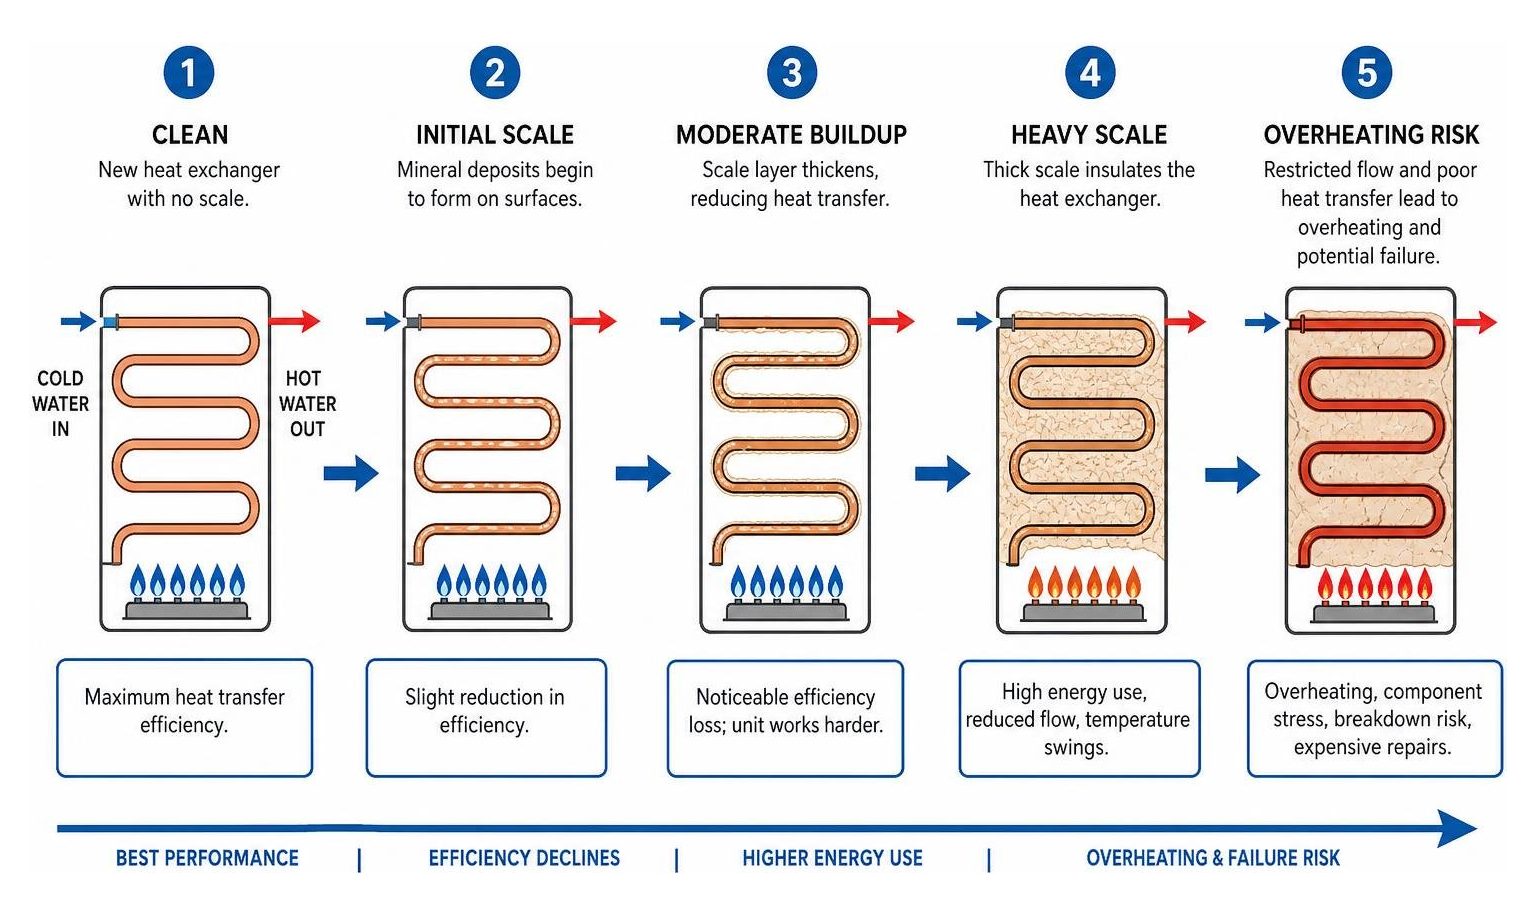
Tankless water heaters heat water instantly as cold water flows through narrow passageways inside a copper or stainless steel heat exchanger. Because this heating happens in seconds at high temperatures, dissolved minerals in your water—primarily calcium and magnesium—precipitate out of solution and form hard scale on the metal walls.
Over time, this mineral scale forms an insulating crust. As little as 1/8 inch of scale buildup can reduce heat transfer efficiency by 20% to 30%. This forces your burner to run longer and hotter to heat the same volume of water, driving up gas or electrical consumption and straining internal hardware.
Regular tankless water heater maintenance delivers tangible financial and operational benefits:
- Lower Utility Bills: Properly maintained tankless water heaters deliver energy savings of $108 to $180 annually compared to traditional tank models by retaining their high energy factor.
- Extended System Lifespan: A well-maintained tankless water heater can easily last 15 to 20 years. In contrast, a neglected heater operating in hard water conditions can experience catastrophic heat exchanger failure in as little as 7 to 10 years.
- Warranty Preservation: Major manufacturers such as Navien, Rheem, Rinnai, and Takagi require routine maintenance and descaling. Skipping annual care can void your manufacturer warranty, leaving you responsible for costly repair bills.
- Exceptional Return on Investment: Annual maintenance costs roughly $150 to $350, while professional repairs for neglected systems range from $150 to $1,300. Major component replacements, like swapping a cracked heat exchanger, can cost $500 to $1,000 in parts alone. The long-term ROI of annual flushing approaches 10:1 when accounting for avoided repairs and energy savings.
Learn more about Tankless Water Heaters to see how on-demand heating functions compared to traditional storage tanks, or consult the Complete 2026 DIY Guide for extra context on system mechanics.
Water Hardness Impact and Recommended Service Intervals
Water hardness is measured in grains per gallon (GPG) or milligrams per liter (mg/L). Water containing over 7 GPG is considered hard, while levels exceeding 10 GPG are classified as very hard. In communities across Cook County and surrounding areas like Roselle, Elmhurst, and Niles, municipal water supplies often carry substantial mineral loads.
When water is heated above 120°F, calcium carbonate crystalizes rapidly. Setting your thermostat between 120°F and 125°F helps minimize scale formation while keeping your water safely heated without scalding risks.
| Water Hardness Level | GPG Rating | Recommended Flush Frequency |
|---|---|---|
| Soft Water | 0 – 3 GPG | Every 18 to 24 months |
| Moderate Water | 3.5 – 7 GPG | Every 12 months |
| Hard Water | 7.5 – 10 GPG | Every 6 to 9 months |
| Very Hard Water | 10+ GPG | Every 4 to 6 months |
For homes dealing with severe water hardness, installing a whole-house water softener or an anti-scale treatment pre-filter drastically reduces mineral buildup, keeping your heat exchanger cleaner between flushes.
DIY vs Professional Service: What You Can Do Safely
Many homeowners ask whether tankless water heater maintenance can be performed as a DIY project. The short answer is yes—tasks like cleaning the inlet filter, inspecting the air screen, and performing a basic vinegar flush are well within the reach of a handy homeowner who follows the owner manual carefully.
However, a hybrid approach often works best: perform basic cleaning yourself, but schedule a licensed technician for comprehensive annual checkups.
- Safe DIY Tasks: Rinsing the cold water inlet filter screen, clearing external intake/exhaust vents, cleaning external air intake filters, and circulating non-toxic white vinegar through isolation valves.
- Tasks Requiring a Professional Plumber: Checking gas manifold pressure, adjusting fuel-to-air ratios, inspecting internal electrical wiring and circuit boards, rebuilding internal 3-way water valves, replacing circulation pumps, or inspecting internal gas burner assemblies.
Attempting to disassemble gas burners or electrical components without certification carries severe safety risks and will likely void your unit’s warranty. If you ever feel uncertain, calling a licensed plumber ensures the job is done safely and correctly.
Step-by-Step Guide: Flushing and Descaling Your Heat Exchanger
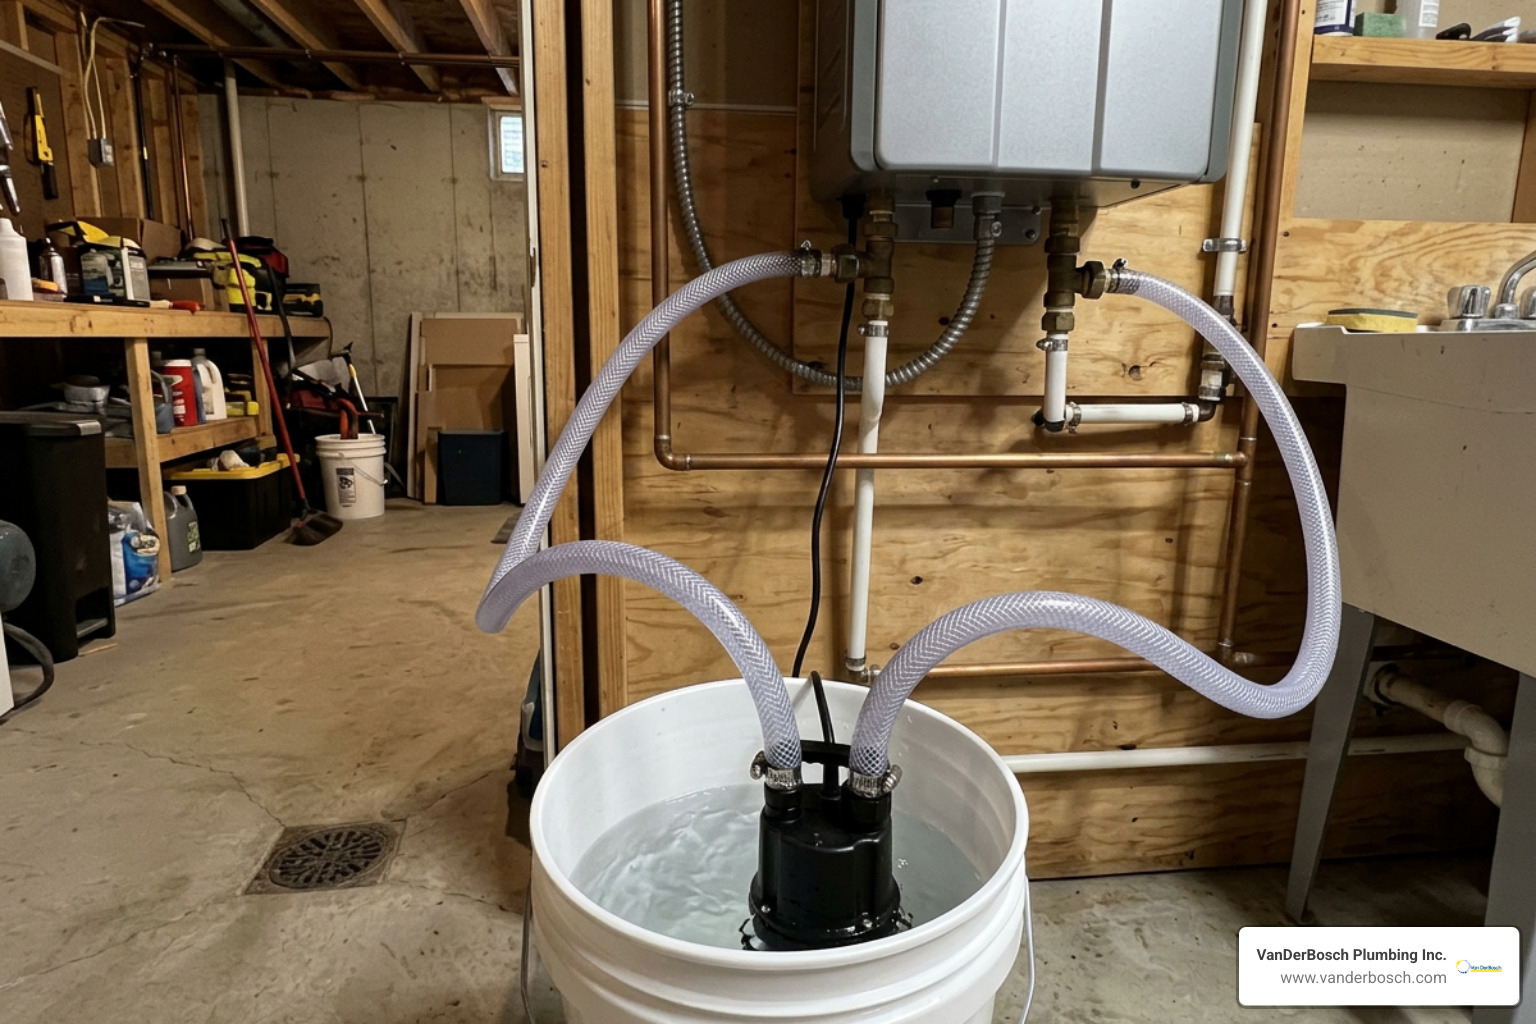
Flushing and descaling involves circulating a mild acid through the heat exchanger for 45 to 90 minutes to dissolve mineral deposits without harming internal copper or stainless steel tubing.
Before beginning, review the general process outlined in this Comprehensive Water Heater Maintenance Guide and consult the Annual Maintenance Checklist to ensure you have all necessary safety equipment on hand.
Tools Needed for DIY Tankless Water Heater Maintenance
To perform a proper heat exchanger flush, gather these supplies:
- Submersible Pump: A 1/6 HP to 1/4 HP utility pump designed for water or mild acids.
- Two Short Hoses: Standard 6-foot garden hoses or washing machine supply hoses with female hose fittings.
- 5-Gallon Bucket: A clean plastic bucket to hold the descaling solution.
- Descaling Agent: 3 to 4 gallons of food-grade virgin white vinegar (5% acidity). Avoid industrial strength acids or bleach, which can corrode internal seals and copper pipes.
- Adjustable Wrench & Channel Locks: For opening purge valve caps and tightening hose connections.
- Safety Gear: Eye protection and rubber gloves.
Flushing and Rinsing Procedure
Follow these step-by-step instructions to descale your tankless water heater safely:
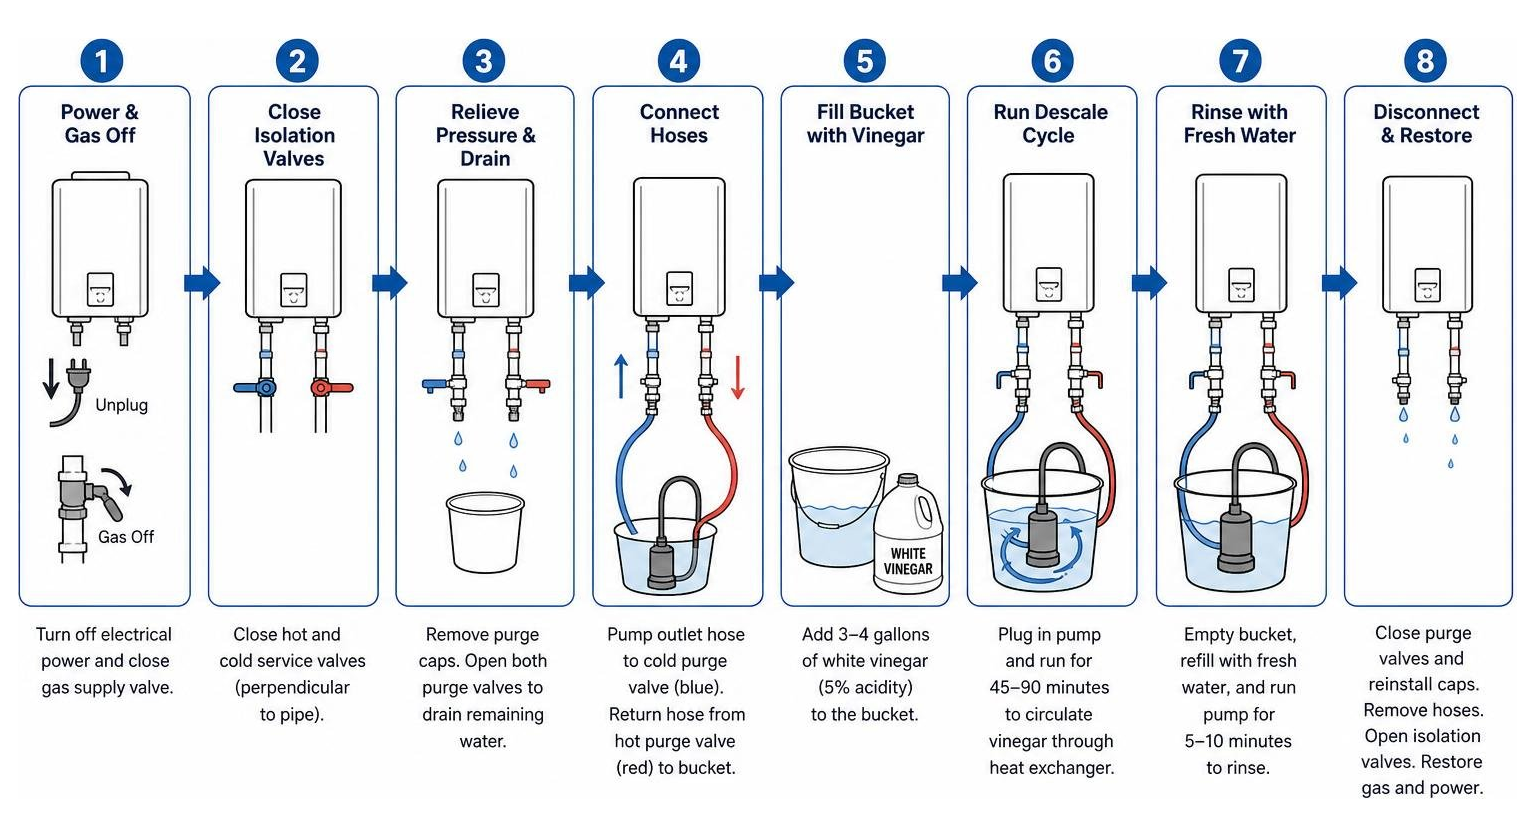
- Power & Gas Isolation: Turn off the electrical power to the unit by unplugging it or switching off its dedicated circuit breaker. Turn off the gas supply valve located on the gas line beneath the unit.
- Close Isolation Valves: Locate the hot and cold water service valves below the unit. Turn the main lever handles so they are perpendicular to the pipe, shutting off cold water entering the heater and hot water leaving for the house.
- Relieve Pressure & Drain: Remove the threaded safety caps from the purge ports on both the cold (blue) and hot (red) isolation valves. Place a small bucket beneath to catch residual water, then open both purge valve T-handles to drain remaining water.
- Connect the Hoses:
- Attach the first hose from the discharge outlet of your submersible pump to the cold water purge valve (blue).
- Attach the second hose to the hot water purge valve (red) and run its open end freely into your 5-gallon bucket.
- Prepare and Circulate the Solution: Pour 3 to 4 gallons of undiluted white vinegar into the bucket, submerging the pump completely. Open both purge valve T-handles fully. Plug in the pump to start circulating vinegar through the heat exchanger.
- Run the Flush Cycle: Allow the pump to circulate vinegar continuously for 45 to 60 minutes. If your unit has not been serviced in years, extend the flush cycle to 90 minutes. The vinegar will gradually dissolve calcium scale, turning the solution cloudy or dirty.
- Rinse with Fresh Water: Unplug the pump and close the cold water purge valve. Disconnect the hose from the cold purge valve. Leave the hose attached to the hot purge valve dumping into the bucket or drain. Open the main cold water inlet valve slightly to allow fresh water to flow through the heat exchanger and flush out residual vinegar for 3 to 5 minutes until the water runs completely clear and odorless.
- Re-pressurize and Start Up: Close the hot purge valve, remove the hose, and replace both purge valve caps securely. Open both main hot and cold isolation valves fully. Open a hot water faucet inside your home for a minute to bleed trapped air out of the water lines. Restore gas supply, plug in electrical power, and test the unit by running hot water.
For additional detailed tips on isolation valves, consult your owner’s manual or reach out to a licensed plumbing technician.
Cleaning Filters, Condensate Traps, and Safety Valves
Flushing the heat exchanger is only half the maintenance story. A complete service requires cleaning internal filter screens, clearing condensate lines, and testing safety relief valves.
Inlet Filter, Air Screen, and Condensate Trap Care
Cold Water Inlet Filter Screen
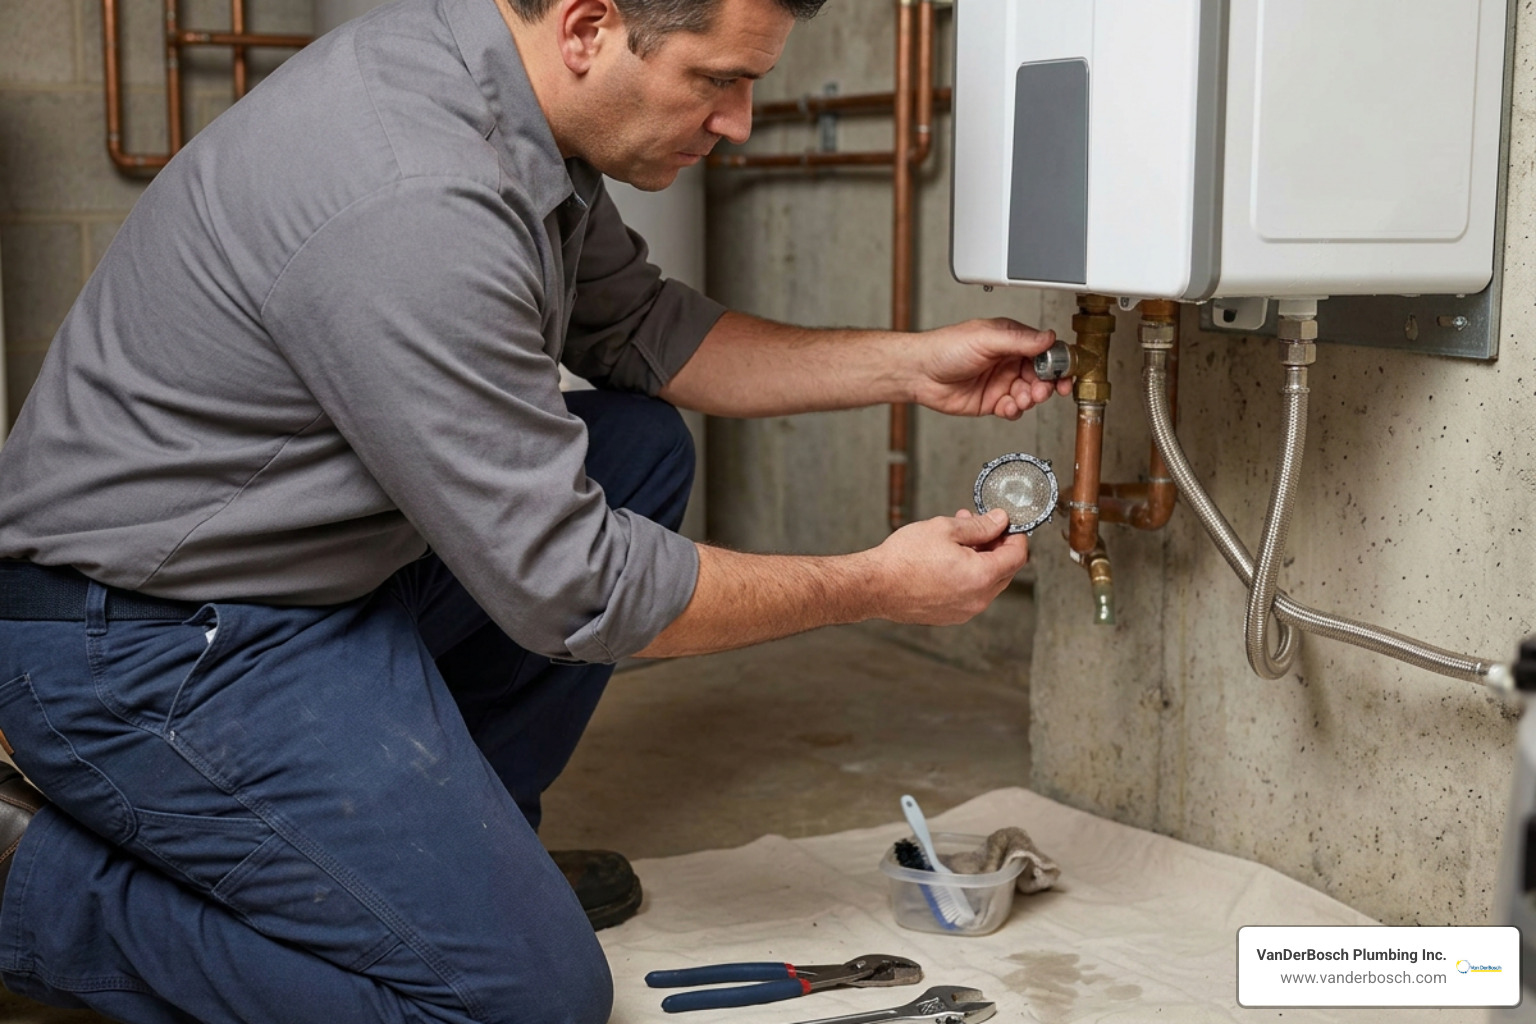
Your tankless water heater features a small mesh filter screen located on the cold water inlet assembly to catch sediment, rust particles, and debris before they reach the heat exchanger.
- Shut off the cold water isolation valve.
- Unscrew the filter assembly plug (usually located on the bottom left of the plumbing connections) using channel lock pliers or fingers.
- Remove the plastic mesh screen, rinse under cold running water, and scrub gently with a soft toothbrush to clear captured sand and debris.
- Reinsert the screen, verify the rubber O-ring seal is seated correctly to prevent leaks, and hand-tighten the plug.
Air Intake Filter
Gas tankless water heaters draw outside air into the cabinet for fuel combustion. Dust, lint, and cobwebs can accumulate on the air screen, disturbing the fuel-to-air mixture.
- Remove the front cover panel of the unit.
- Locate the plastic air intake filter attached to the blower fan housing at the top or side of the unit.
- Unscrew or unclip the filter, wash it under running water, let it dry completely, and reinstall it.
Condensate Trap Care (Condensing Models)
High-efficiency condensing tankless water heaters produce acidic condensate during combustion. This liquid drains into an internal condensate trap and neutralizer.
- Inspect the clear condensate trap cup located at the bottom of the internal cabinet.
- Disconnect the wire clip or drain hose, remove the cup, and dump out accumulated sediment.
- Verify that condensate neutralizer media (marble chips/calcium carbonate) inside the inline neutralizer capsule is filled to at least 50% capacity. If depleted, replenish the media to prevent acidic liquid from etching your plumbing lines.
Testing Safety Valves and Winterization Procedures
Every tankless water heater is equipped with a Temperature and Pressure Relief (TPR) valve designed to release water if temperature or pressure exceeds safe limits.
Testing the TPR Valve
Place a small bucket beneath the copper discharge pipe connected to the TPR valve. Gently lift the manual test lever. A small burst of water should discharge into the bucket. Release the lever; the valve should snap shut immediately without dripping. If water continues to drip or the valve fails to release water, it must be replaced immediately. Review this guide on Troubleshooting Pressure Relief Valves for additional troubleshooting steps.
Winterization in Cold Climates
During harsh Chicagoland winters, outdoor temperatures can freeze water inside uninsulated pipes or exterior vent terminations. While modern units have electric anti-freeze heaters built in, these fail during winter power outages.
If a prolonged power outage occurs during freezing weather:
- Turn off the main gas and electrical supplies to the unit.
- Close the main hot and cold isolation valves.
- Open all purge valves and remove the cold water inlet filter assembly to drain every drop of water from the heat exchanger and internal pumps.
- Insulate all exposed copper lines underneath the unit using foam pipe insulation sleeves.
For additional specialized care recommendations on internal components, check our article on Circulation Pump Replacement Advice.
Advanced System Inspections and Troubleshooting
Inspecting mechanical combustion parts and understanding diagnostic alerts ensures your system operates safely year-round.
Signs You Need Urgent Tankless Water Heater Maintenance
Do not wait for an annual calendar alert if your system shows signs of distress. Schedule immediate tankless water heater maintenance if you observe:
- The “Cold Water Sandwich”: Experiencing a sudden burst of cold water midway through a hot shower often points to scale build-up on the internal flow sensor or slow ignition response.
- Unusual Noises: Banging, rumbling, or high-pitched squealing noises indicate severe mineral scale buildup overheating localized spots on the heat exchanger.
- Reduced Water Flow: A noticeable drop in hot water pressure—while cold water pressure remains normal—suggests a severely clogged inlet filter screen or scale-restricted heat exchanger passageways.
- Temperature Fluctuation: Water cycling between scalding hot and cold usually means the system is overheating due to scale and shutting down burner operation as a safety precaution.
If you notice persistent flow issues, consult our guide on Navien Maintenance Tips and our Guide to Valve Replacement.
Inspecting Combustion, Venting, and Gas Lines
Burner & Flame Inspection
Look through the small glass sight hole on the front of the combustion chamber while the unit is firing. A healthy burner displays a steady, clear blue flame. A yellow or floating flame indicates dirty burner orifices, improper air intake airflow, or incorrect gas pressure, requiring professional cleaning.
Venting Clearance
Walk outside your home and inspect the stainless steel or PVC intake and exhaust vent terminations. Ensure vents are clear of snow, ice, bird nests, leaves, and outdoor shrubbery. A blocked vent will trigger system error codes and force an automatic safety shutdown.
Gas Line Bubble Test
Check for gas leaks periodically by mixing a few drops of liquid dish soap with water and spraying it onto external gas pipe fittings and manual shutoff valves. If growing bubbles appear, shut off the main gas valve immediately and call your utility company or a licensed plumber.
Diagnostic Error Codes
Modern tankless units monitor operational metrics automatically. Here are common error codes across popular brands:
| Brand | Error Code | Meaning | Primary Cause & Solution |
|---|---|---|---|
| Navien | E003 / E012 | Flame loss / Ignition failure | Clean igniter electrode; check gas supply |
| Navien | E016 | Heat exchanger overheating | Scale buildup on heat exchanger; perform full flush |
| Rheem | Code 11 / 12 | No ignition / Flame loss | Clean flame sensor; check gas line pressure |
| Rheem | Code 29 | Neutralizer / Venting issue | Clogged condensate drain or scaled heat exchanger |
| Takagi | Code 101 / 111 | Incomplete combustion | Clean air filter; perform extended vinegar flush |
| Rinnai | Code 10 / 11 | Air flow blockage / No ignition | Clear external exhaust vent; check spark igniter |
For brand-specific service options in your neighborhood, explore our dedicated page for Roselle Services Tankless Water Heater or check out our general overview of Services Tankless Water Heater.
Frequently Asked Questions about Tankless Water Heater Servicing
What happens if I never flush my tankless water heater?
If you never flush your tankless water heater, mineral scale will continue to bake onto the heat exchanger copper walls. This scale layer acts as thermal insulation, causing internal metal temperatures to spike dramatically during heating cycles.
Eventually, localized overheating will cause the heat exchanger metal to expand, stress, and crack, resulting in internal water leaks that destroy the unit’s electrical circuit boards. Furthermore, scale-induced heat exchanger failure is explicitly excluded from manufacturer warranty coverage.
Can I use regular white vinegar to descale my water heater?
Yes! Standard food-grade gallon jugs of virgin white vinegar (5% acetic acid) are ideal for routine annual descaling. White vinegar is non-toxic, safe for residential drinking water plumbing, gentle on internal rubber O-rings, and highly effective at dissolving calcium carbonate scale.
For severely scaled units that have not been serviced in over three years, certified technicians may use stronger, non-corrosive commercial descaling solutions specifically formulated for tankless copper heat exchangers.
How do I reset the maintenance reminder on my tankless display?
Many modern tankless water heaters feature a built-in maintenance timer that displays a reminder code (such as Rheem’s 500-hour alert or Navien’s service alarm) after set operational hours.
To reset the maintenance alert:
- Turn off the remote controller or front display power button.
- Access the main circuit board inside the front cover panel (or use the controller interface depending on your model).
- On many units, pressing and holding the “Up” and “Down” arrows or the “Reset” button simultaneously for 5 to 10 seconds clears the timer and resets the counter back to zero. Always consult your specific model’s manual for exact button sequences.
Conclusion
Taking time to perform routine tankless water heater maintenance pays substantial dividends over your system’s life. By keeping heat exchangers scale-free, inlet filter screens clear, and safety relief valves tested, you ensure continuous, energy-efficient hot water while protecting your equipment warranty.
Whether you prefer performing annual vinegar flushes as a DIY project or turning the job over to licensed professionals, consistency is key.
At VanDerBosch Plumbing Inc., our licensed plumbers have provided expert residential and light commercial plumbing services across Chicagoland—including Cook County, Chicago, Winnetka, Oakbrook Terrace, Hyde Park, Sauganash, West Ridge, Ukrainian Village, and Mount Prospect—for decades.
We stand behind our work with a 100% satisfaction guarantee, transparent pricing with no service charges, 24/7 emergency availability, and background-checked technicians.
Ready to extend the life of your system and keep hot water flowing smoothly? Contact VanDerBosch Plumbing Inc. today to schedule your annual service call with our Professional Water Heater Services team!